
DOC COLOUR’S ZOP ZOO CARD GAMEMy Zop Zoo Card Game has been 10 years in the making… quite an incredible labor of love, for sure! It’s a colourful & imaginative card matching game that's fun and exciting to play for both kids & adults. A collection of 126 playing cards designed & illustrated by, yours truly, Doc Colour. There are 10 different animal categories and 66 different animal illustrations all created in my signiture “Zoppy”-style of drawing… Wowwy! A wonderfully visual collection of cards to behold and engage with while playing. Great for game nights, festive gatherings, quaint couples, or special occations! :)
I’m very proud & excited about my new card game creation, and I can’t wait for you to play it with your friends and family! -Doc:)

CARD RULES & PLAY GUIDE
Number of players: 2-4
*It is possible for more players to play,
but 2-4 players is the most optimum for game play.
For ages 7 and up
Equally fun for kids & adults.
Total number of cards: 126
52 cards in the White Deck / 74 cards in the Black Deck.
Playing time varies depending on number of players
Approximately 15-20 minutes per round.

There are 10 different animal categories.
Their point values ascend from 10 Points (MAMMAL) to 60 Points (MYTHICAL).
Each animal has a different background color, which represents their category.
MAMMAL________10 Points (Browns)
OCEAN________15 Points (Blues)
BIRD___________20 Points (Pinks)
INSECT____________25 Points (Yellows)
SEMI-AQUATIC____30 Points (Aquas)
HORNS______________35 Points (Oranges)
REPTILE____________40 Points (Greens)
MARSUPIAL_________45 Points (Mauves)
ARACHNID________55 Points (Reds)
MYTHICAL____________60 Points (Purples)
USE THE LINKS BELOW TO DIRECTLY GO TO A SPECIFIC GAME RULE OR TYPE OF CARD

Match your animal cards (from the white deck) with their matching animal cards (in the black deck) to make them worth POINTS. Each round, be the first player to have POINTS for all of your cards. The first player to reach 800 POINTS wins the game!
*If only 2 people are playing, you can play to 1000 POINTS if you like.
I suggest this because the game plays much faster with just 2 players.

• Separate the white deck from the black deck.
• Shuffle each deck thoroughly.
• Place the black deck face down in the middle of the play area to be the draw pile.
• Choose a designated player to be the dealer of the white deck.
• Allow ample space for each player’s row of cards.
WHITE DECK
(DEALT TO PLAYERS)
BLACK DECK
(DRAW PILE)

The cards in the white deck are always dealt face up for all the players to see.
In the first round, the dealer is dealt the first card. After that, the player who wins the
round is dealt the first card, with the option of giving the deck a "lucky cut" first.
• Going clockwise, the dealer places one card at a time face up in front of each player
until everyone has a row of six animal cards in front of them.
These 6 cards are called your STARTING CARDS.
• The remaining cards in the white deck are no longer needed for this round
(put them aside - out of the play area).
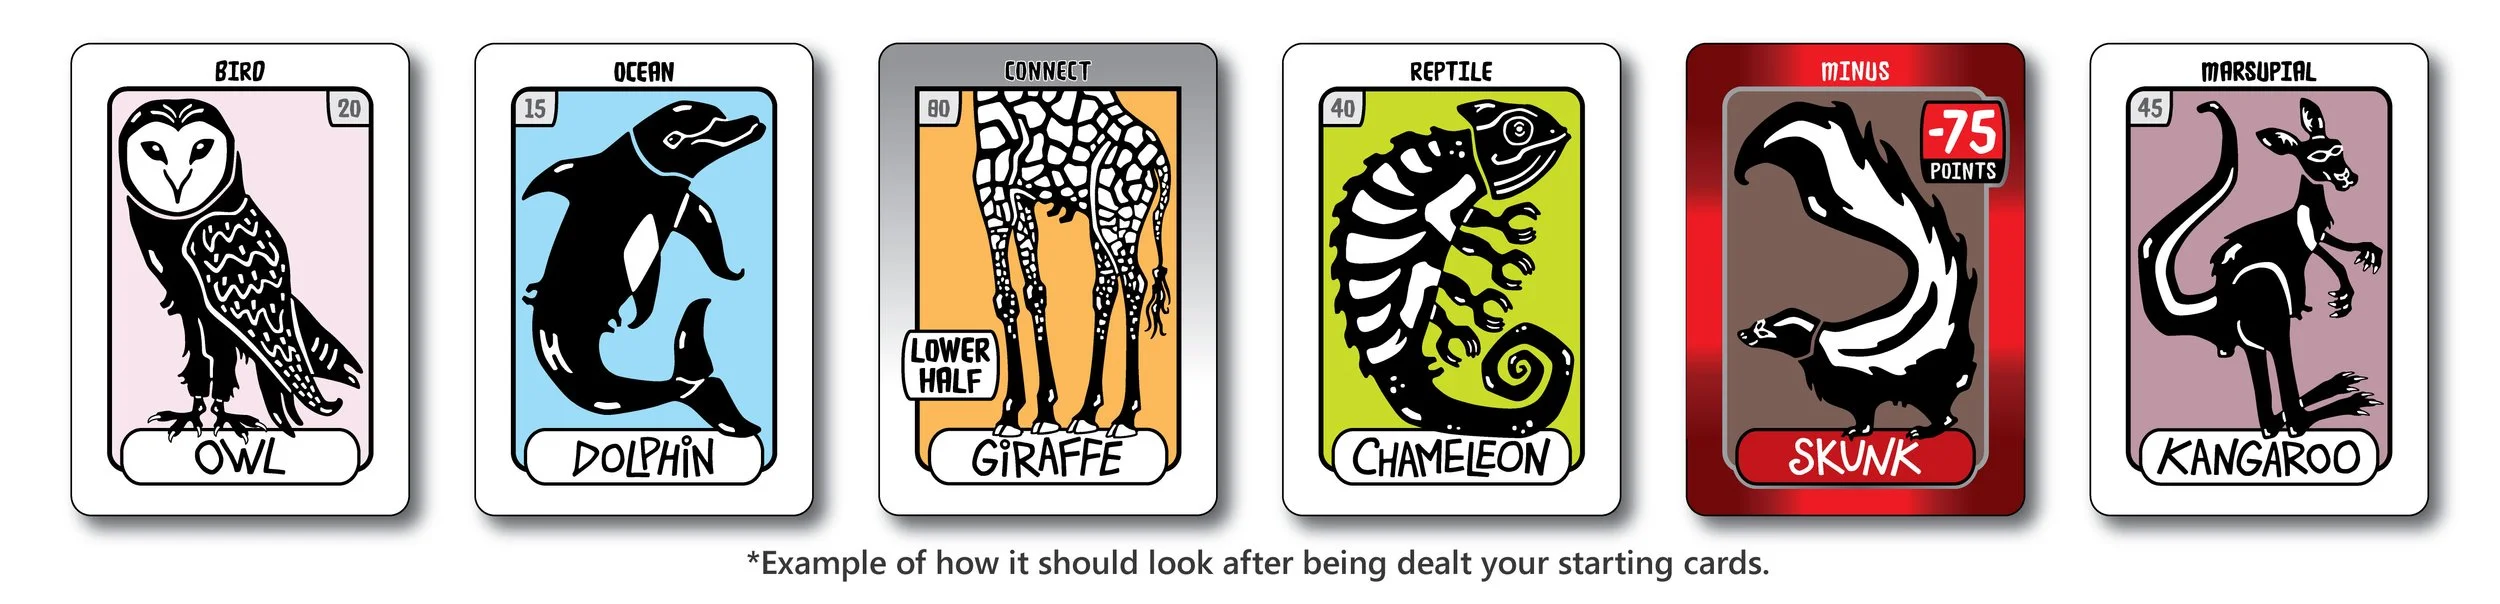


THERE ARE 3 DIFFERENT STARTING CARDS THAT YOU CAN BE DEALT:
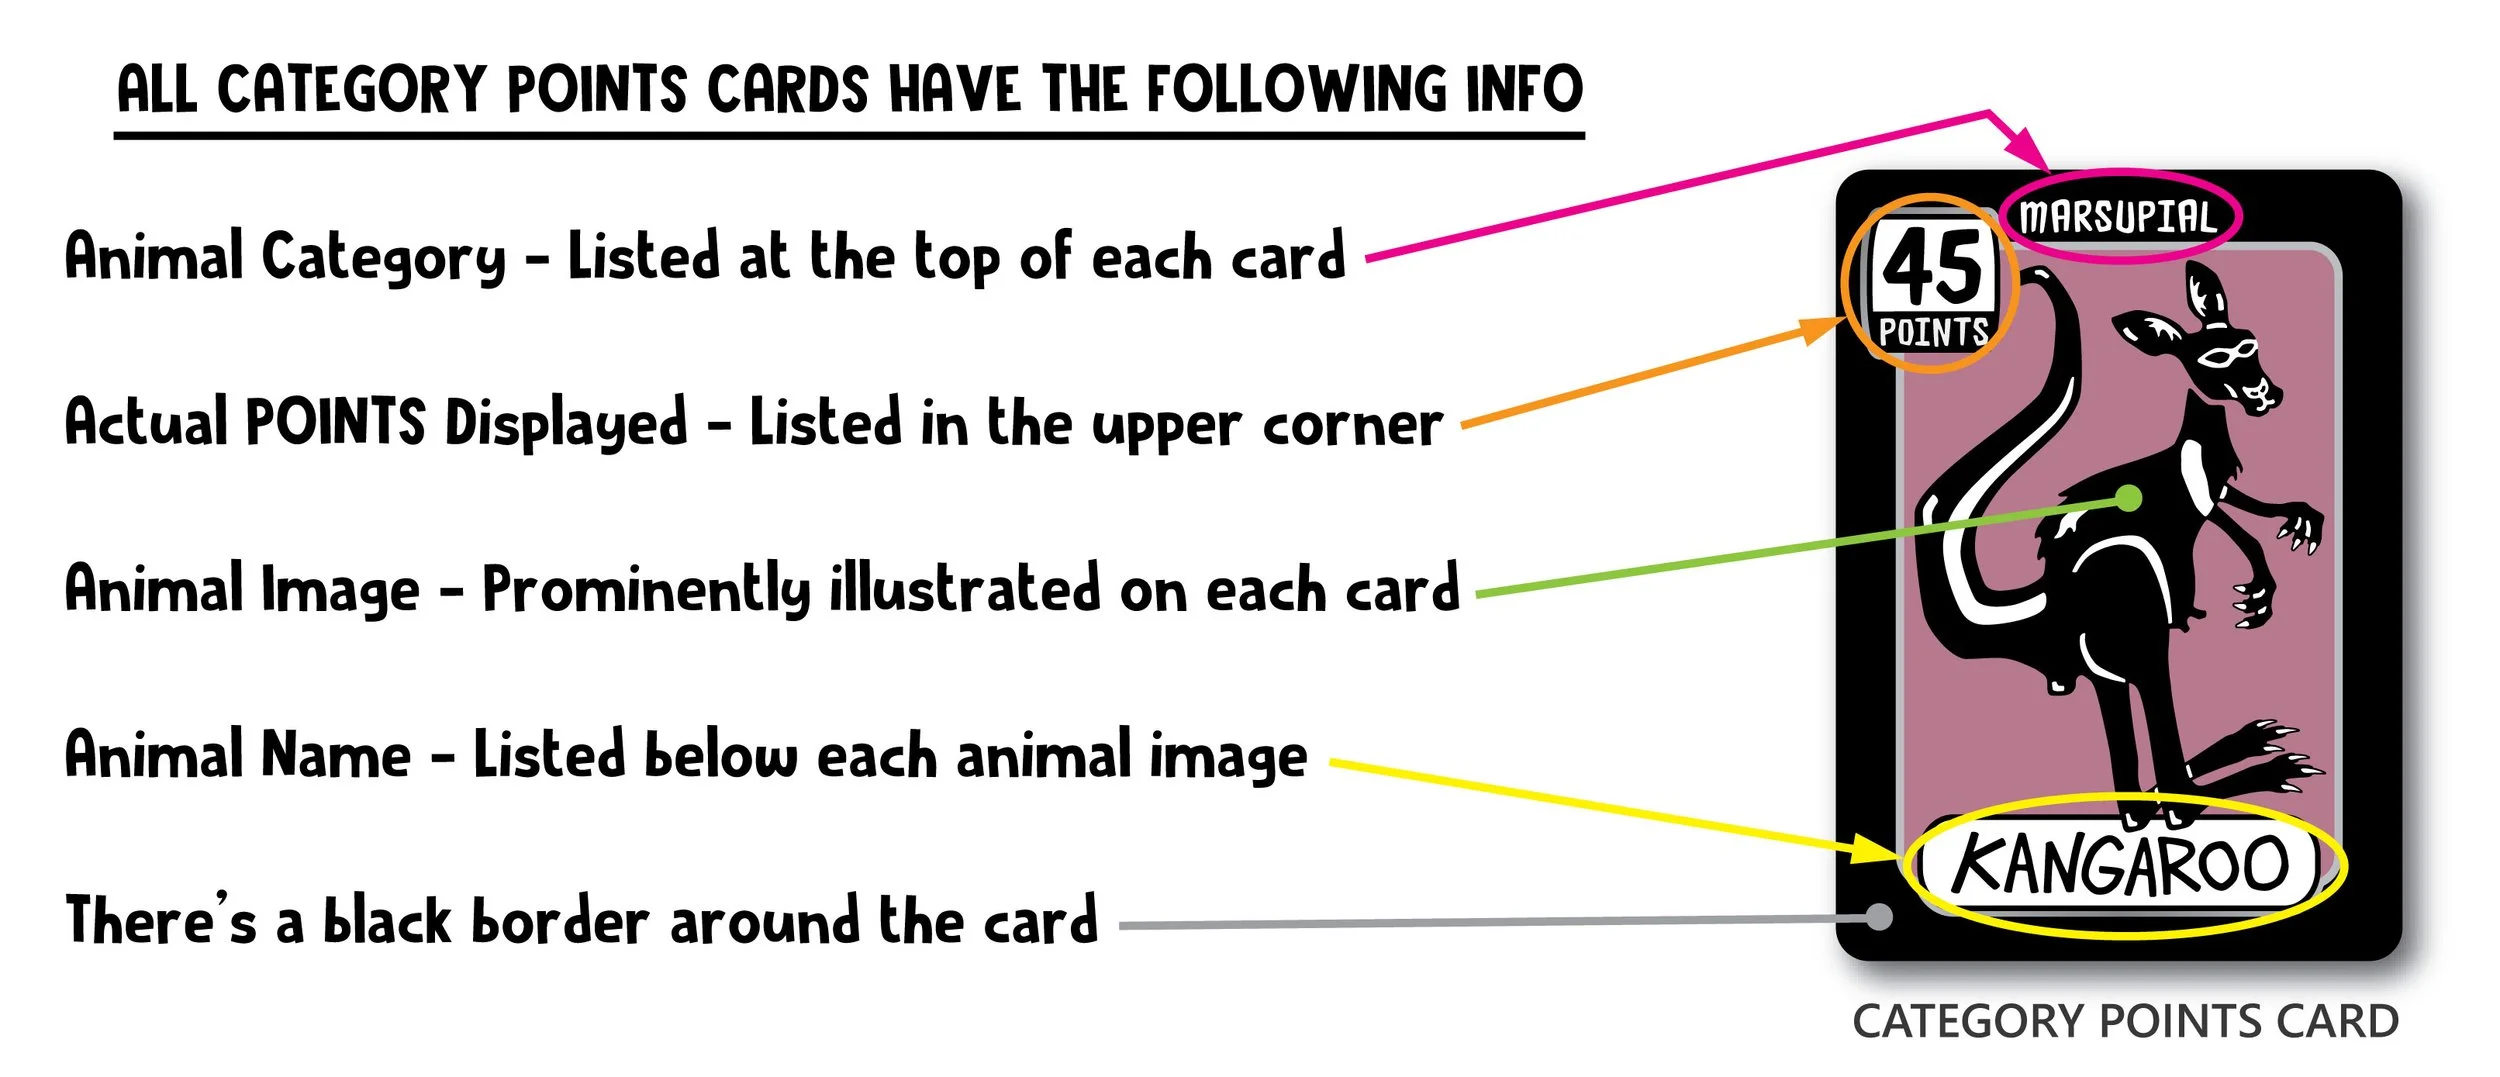
CATEGORY CARDS
These cards have all-white borders around them. They display an animal (with the name of the animal below its illustration) and show the animal’s category at the top of each card. Also, there is a small number in the upper-left or right corner of each card. This number indicates what the point value of the card will be worth when matched.
Currently, these cards aren’t worth POINTS... not until they are matched!
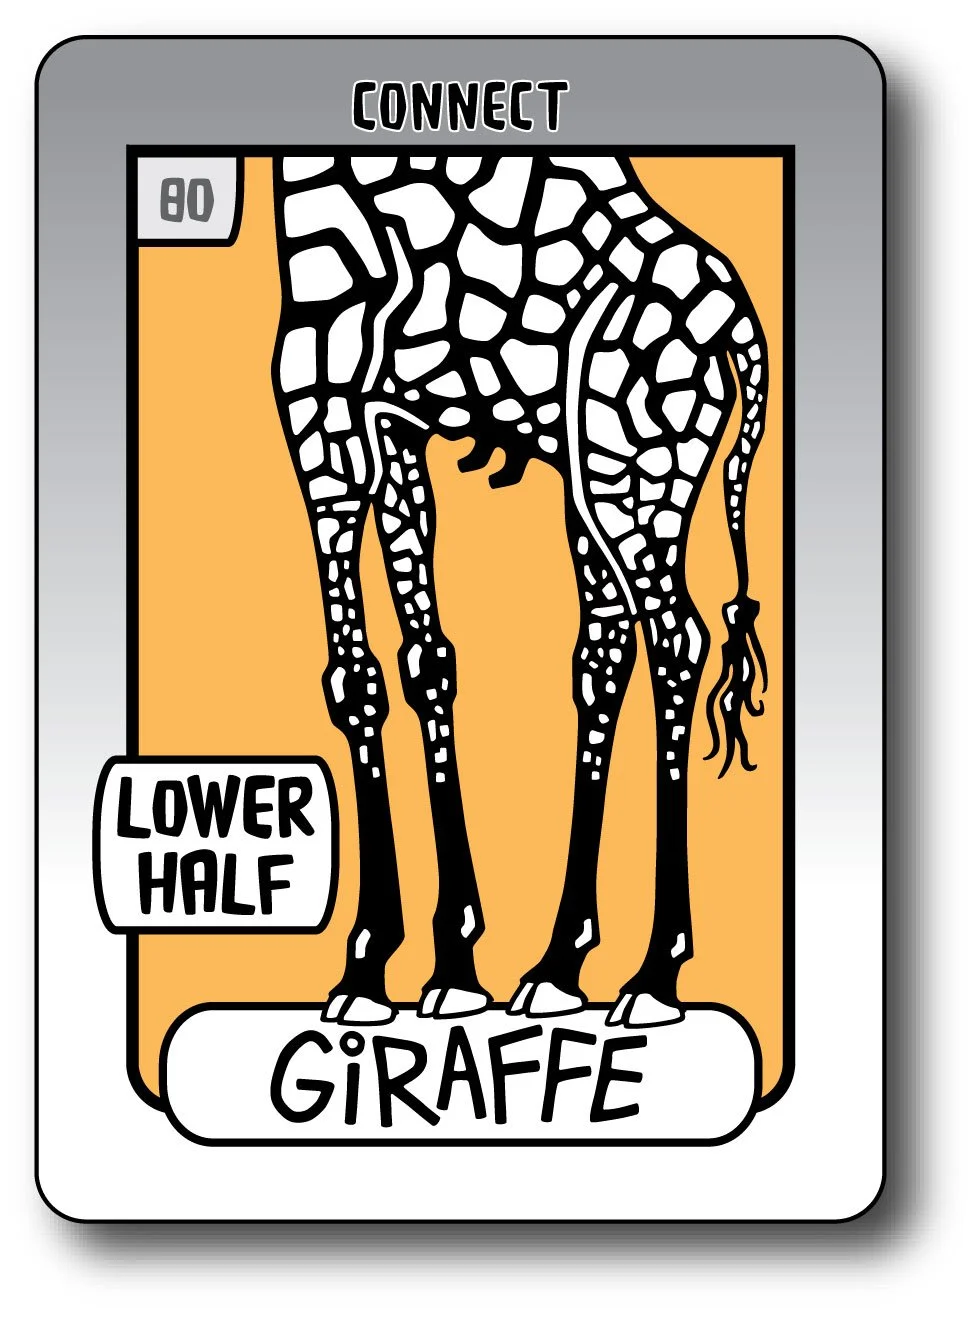
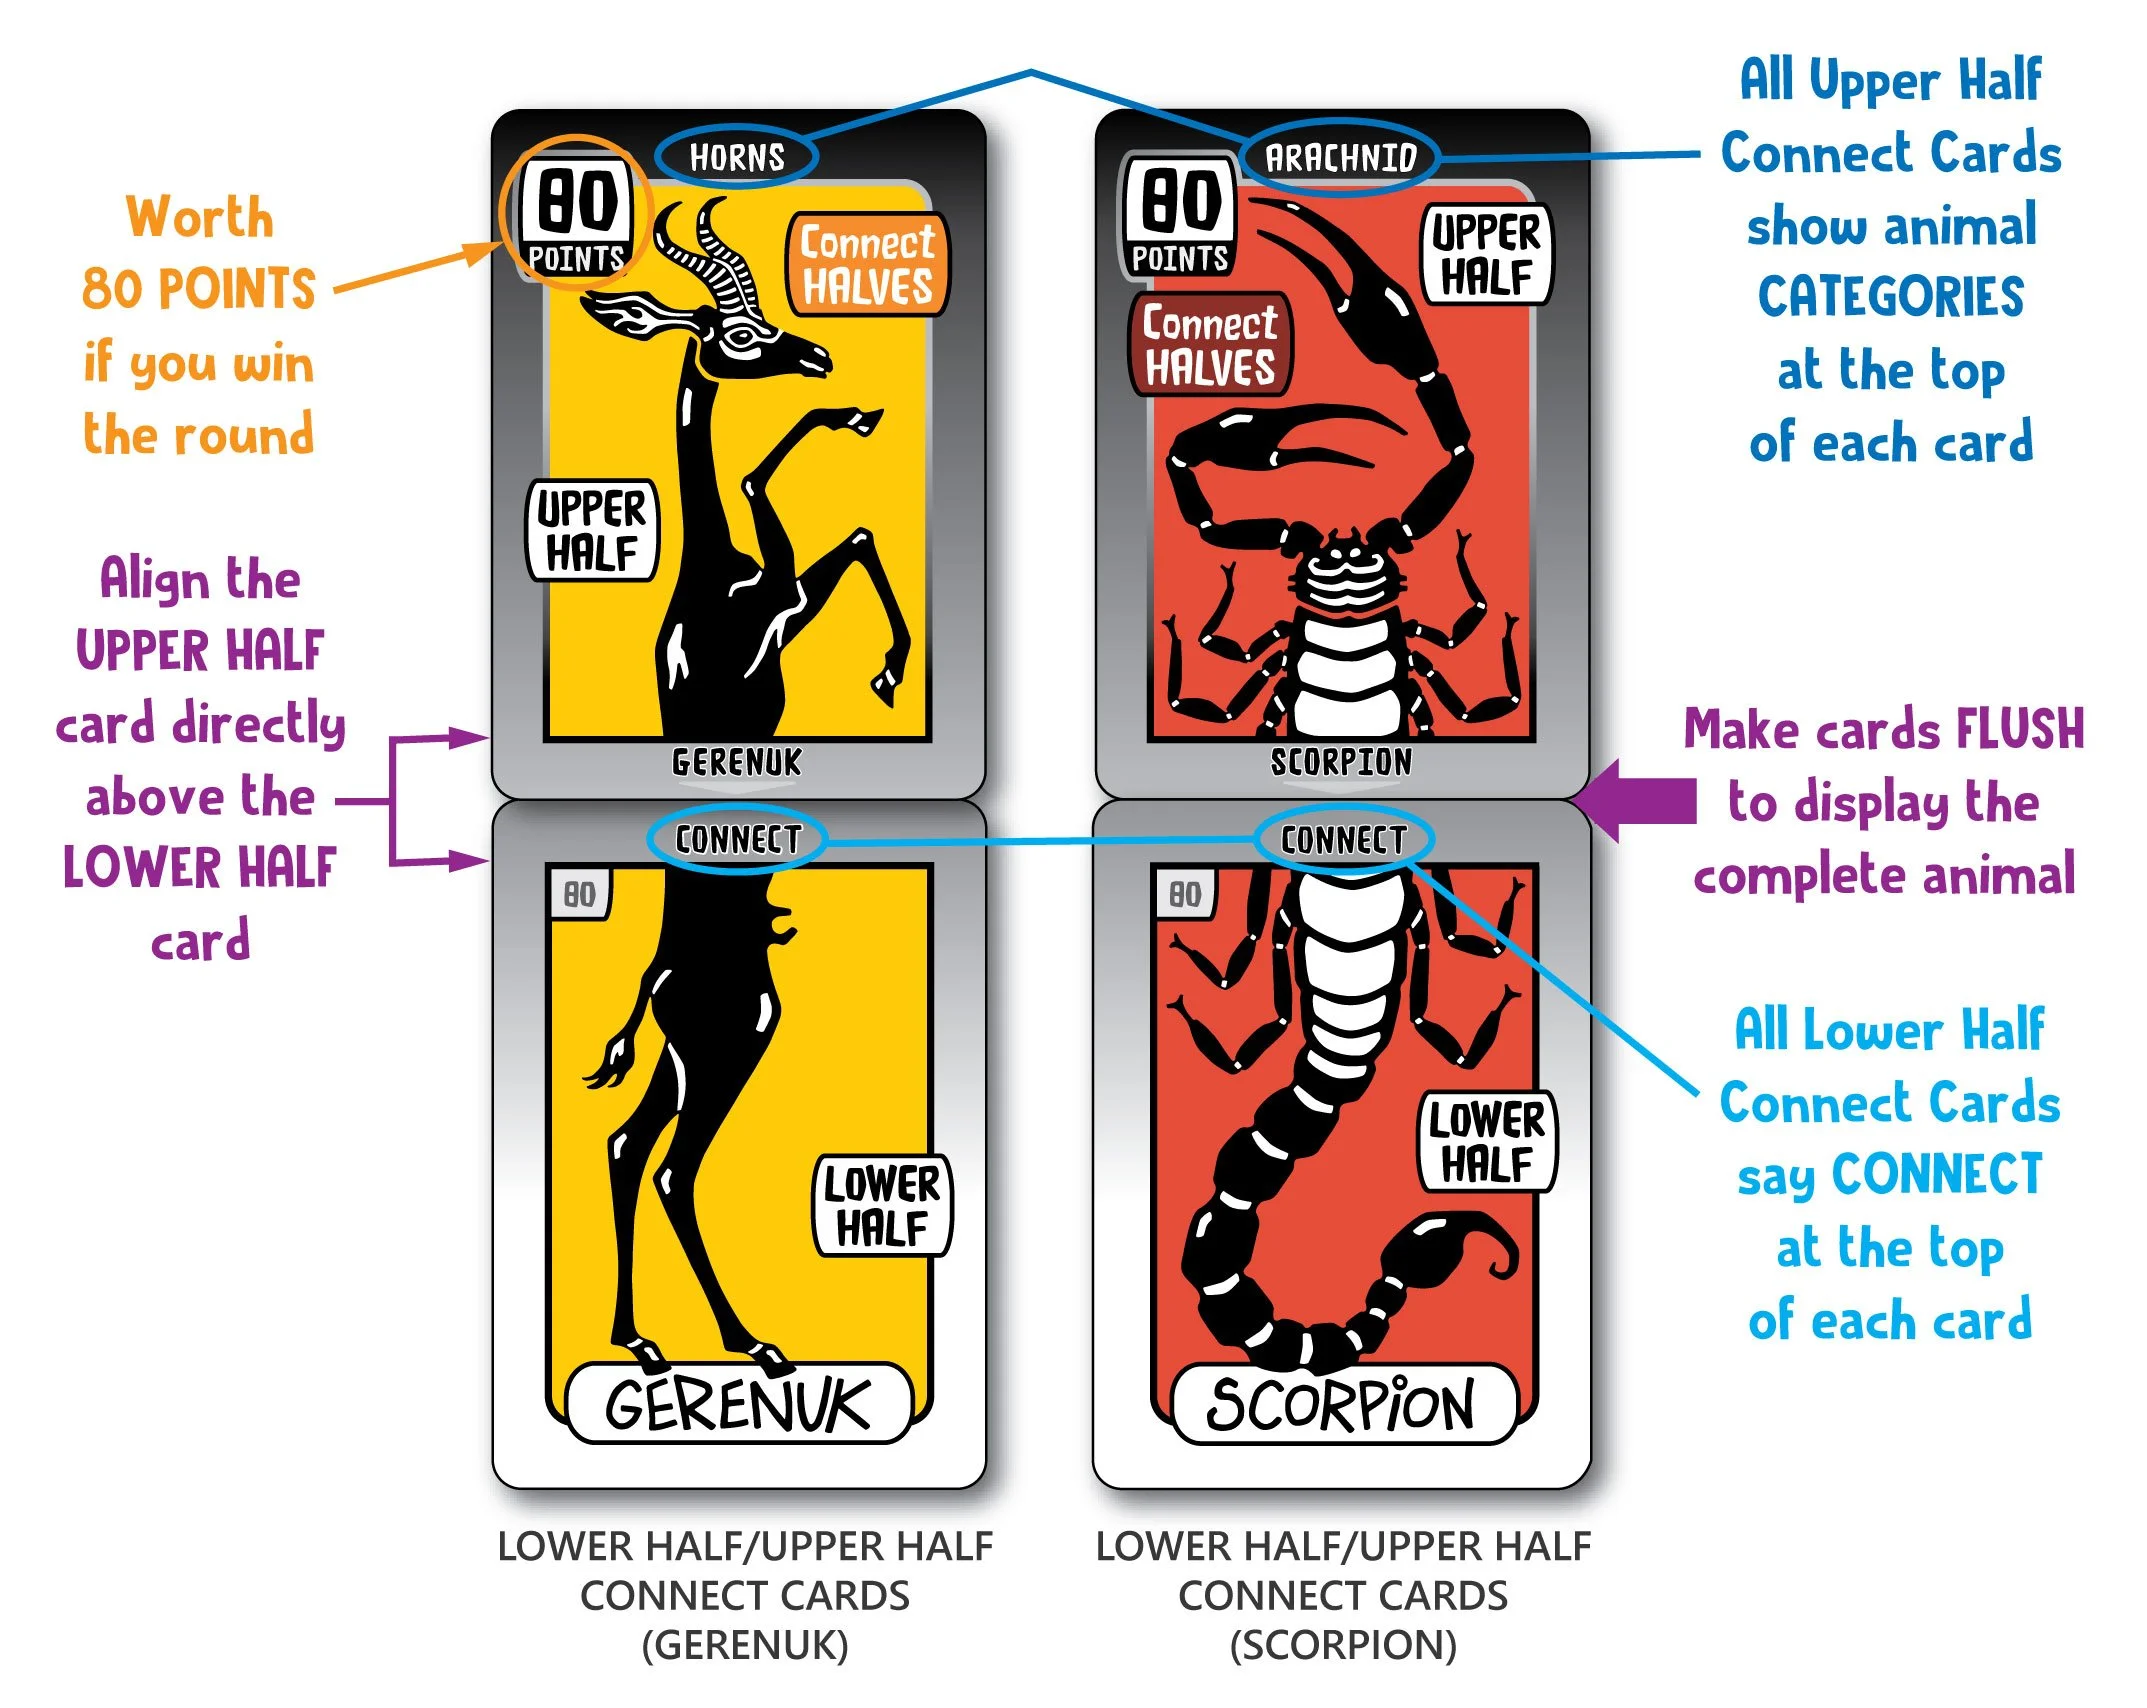
CONNECT CARDS — LOWER HALF
These cards have white-to-gray borders around them. They display only the LOWER HALF of an animal (with the name of the animal below its illustration) and have the word CONNECT at the top of each card. All Lower Half Connect Cards have an indicated point value of 80 points listed in the upper-left or right corner of the card.
These cards will be worth POINTS when connected to their matching UPPER HALF Connect Cards.
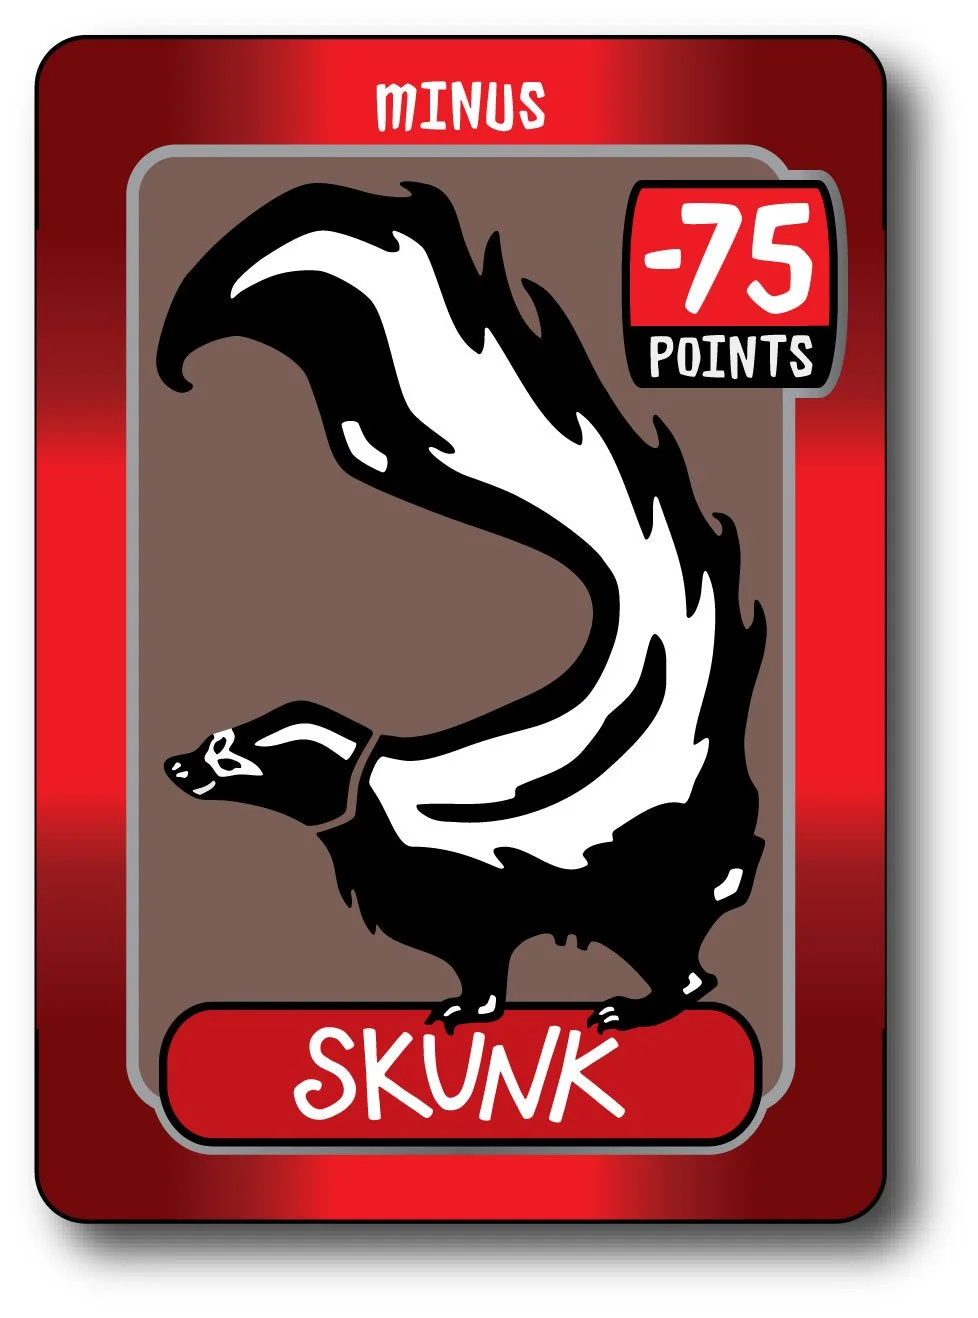
MINUS CARDS
These cards have red-shaded borders around them. They display an animal (with the name of the animal below its illustration) and have the word MINUS on the top of each card. They also show minus POINTS in the upper-right corner of the card.
Minus Cards are already worth POINTS… minus POINTS, that is!
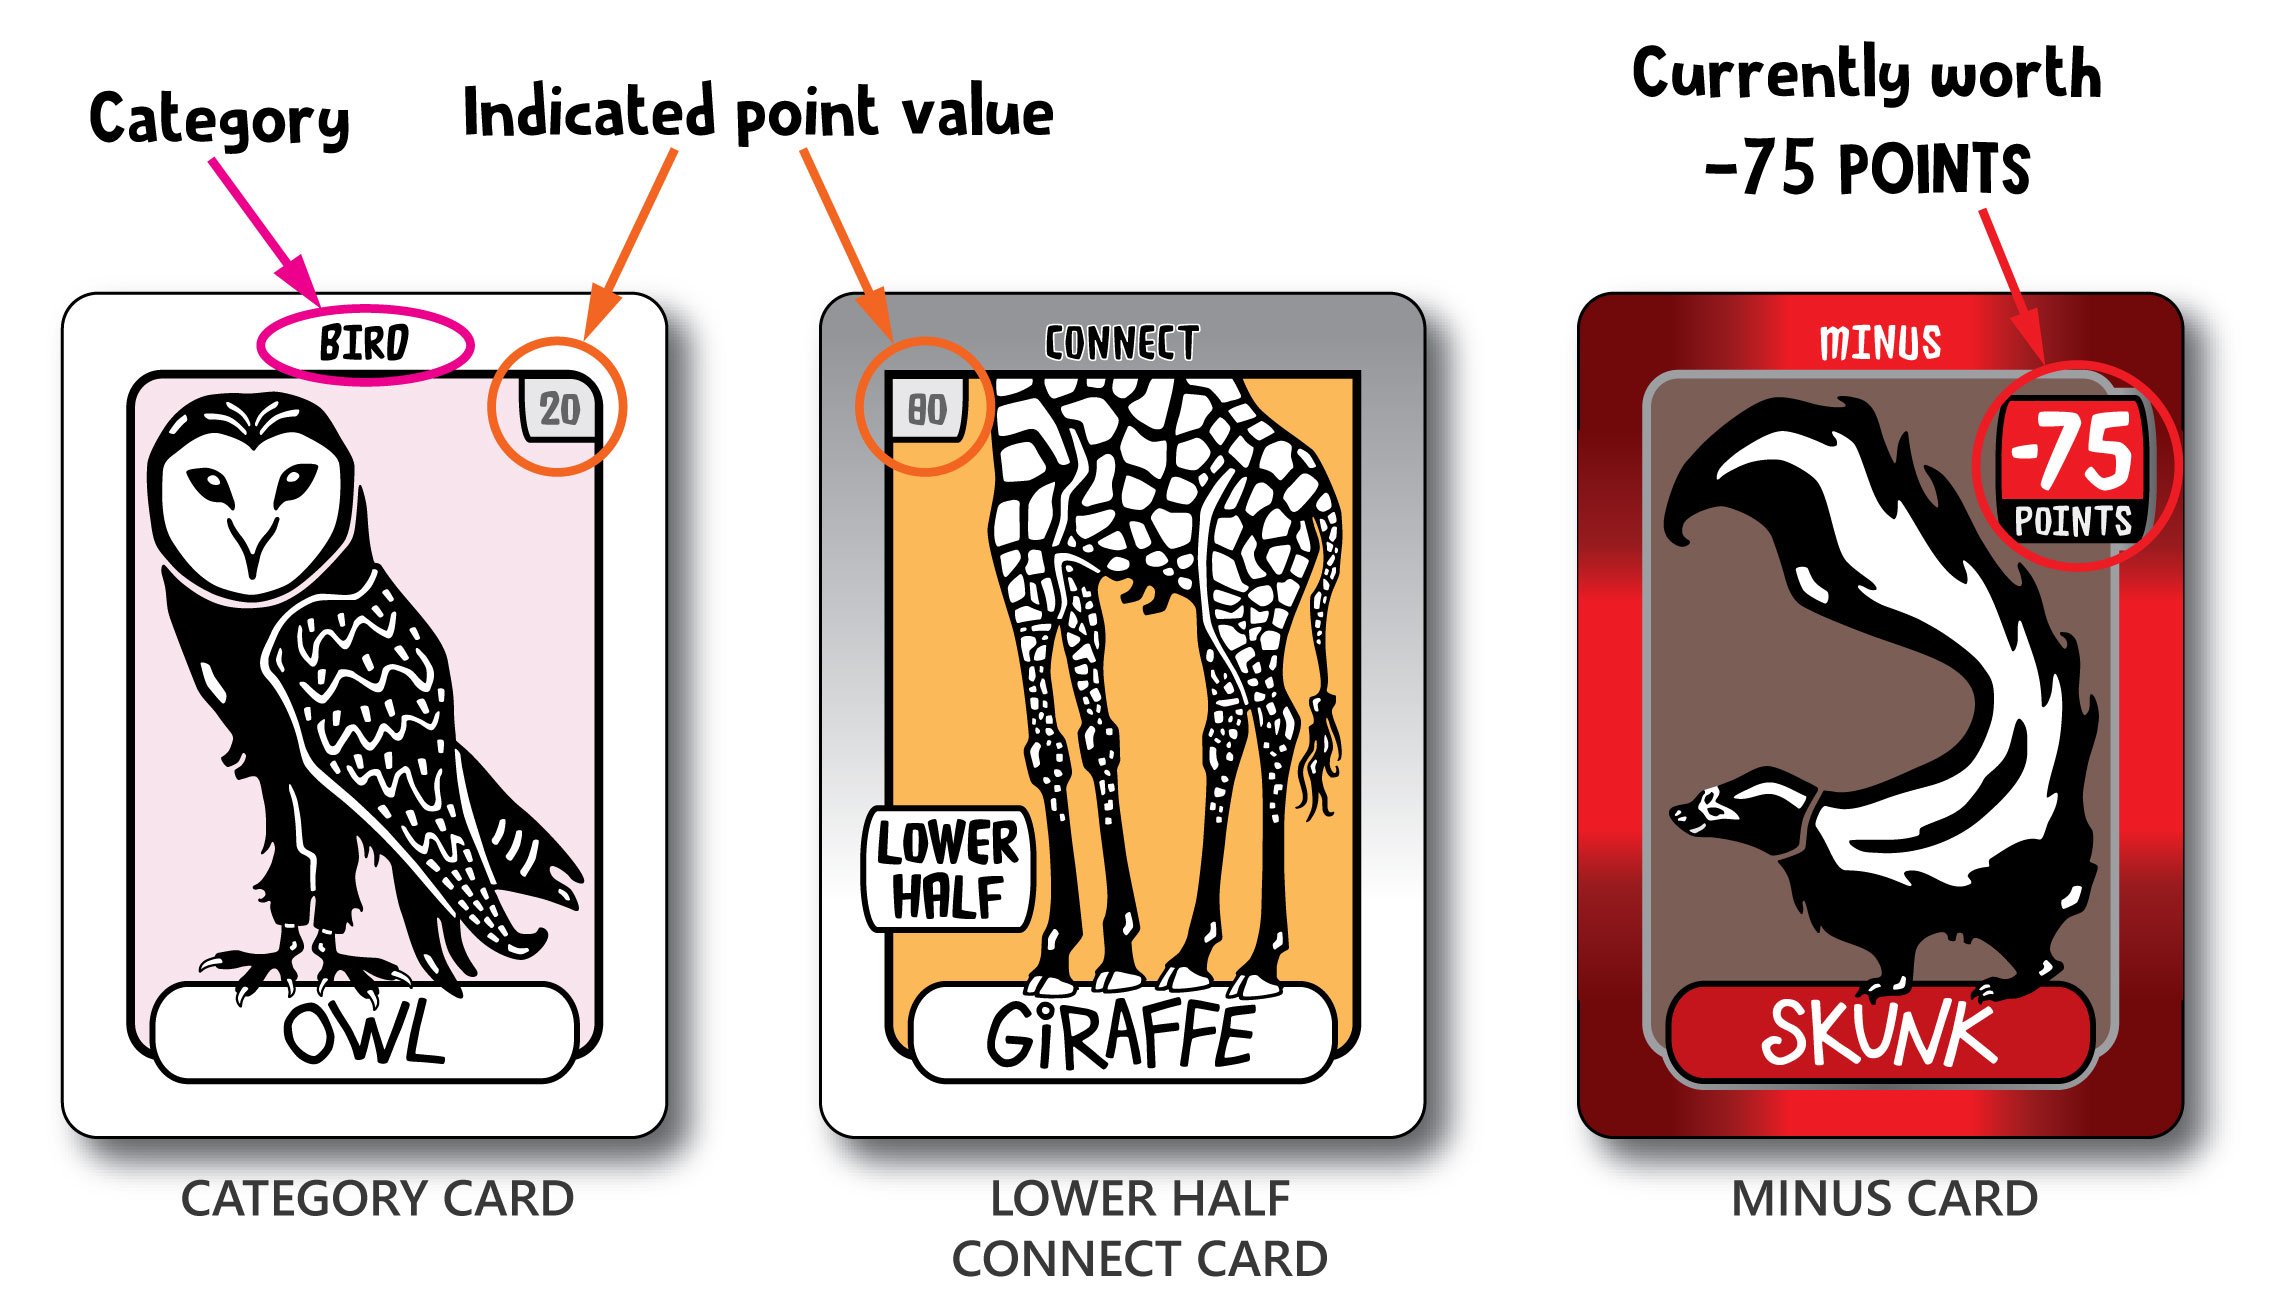
REMEMBER: Only Category Cards and Lower Half Connect Cards are showing indicated point values on them. So, they aren’t showing actual POINTS yet… not until they are covered/connected with their matching animal cards. Minus Cards, however, are always showing actual POINTS (albeit minus points).

The player who was dealt the first card starts each round by picking a card from the draw pile. Every card will show a different animal on it. Your goal is to match all of the animals you see on all 6 of your starting cards with the very same identical looking animals (found within the black deck). Connect Cards, however, are not identical looking. They have a LOWER HALF part of the animal and an UPPER HALF part of the animal. So, these animal illustrations will not look the same… but they still match together to make the same whole animal!
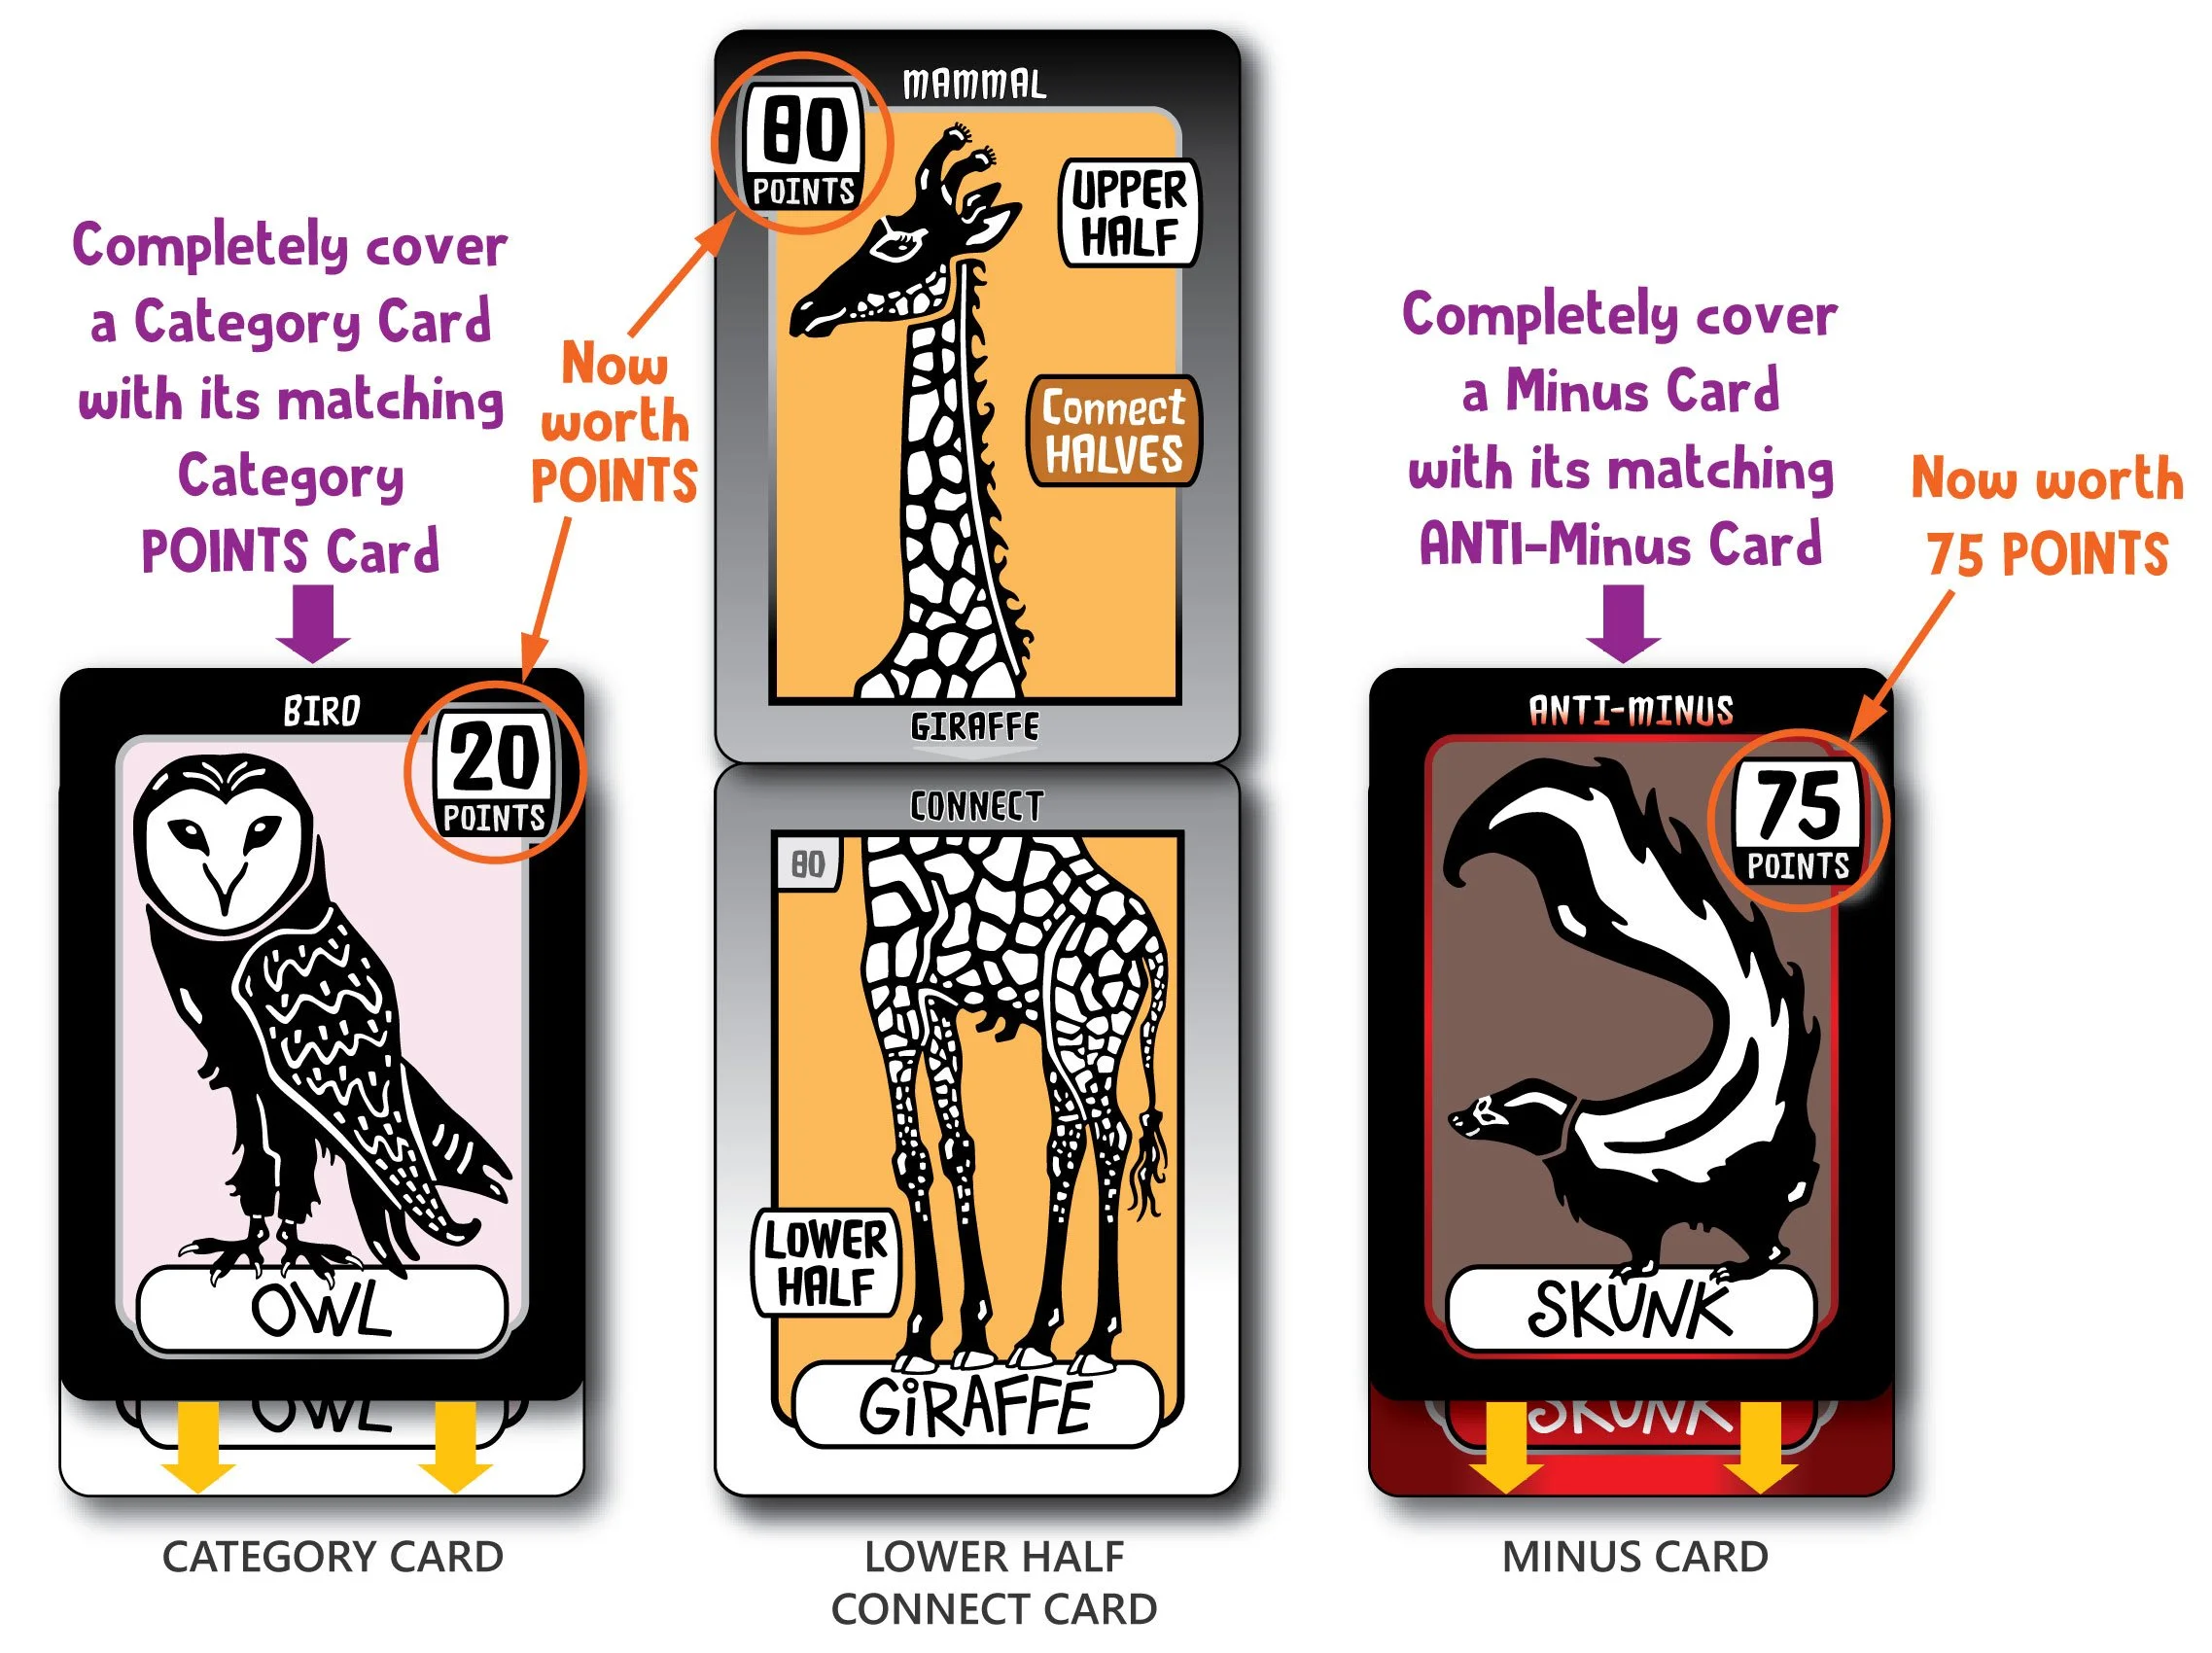
When matching a Category Card or a Minus Card, you lay its
matching animal card OVER it and completely cover it (face up).
When matching a Lower Half Connect Card, it will match to its Upper Half Connect Card.
You align the UPPER HALF of the animal ABOVE the
LOWER HALF of the animal and connect both cards together.
You will now see the entire animal… bottom to top.
*Upper Half Connect Cards will be explained more further down.
Each time one of your starting cards gets covered or connected, it is now worth POINTS!
If you match a card drawn from the draw pile,
your turn continues—draw again.
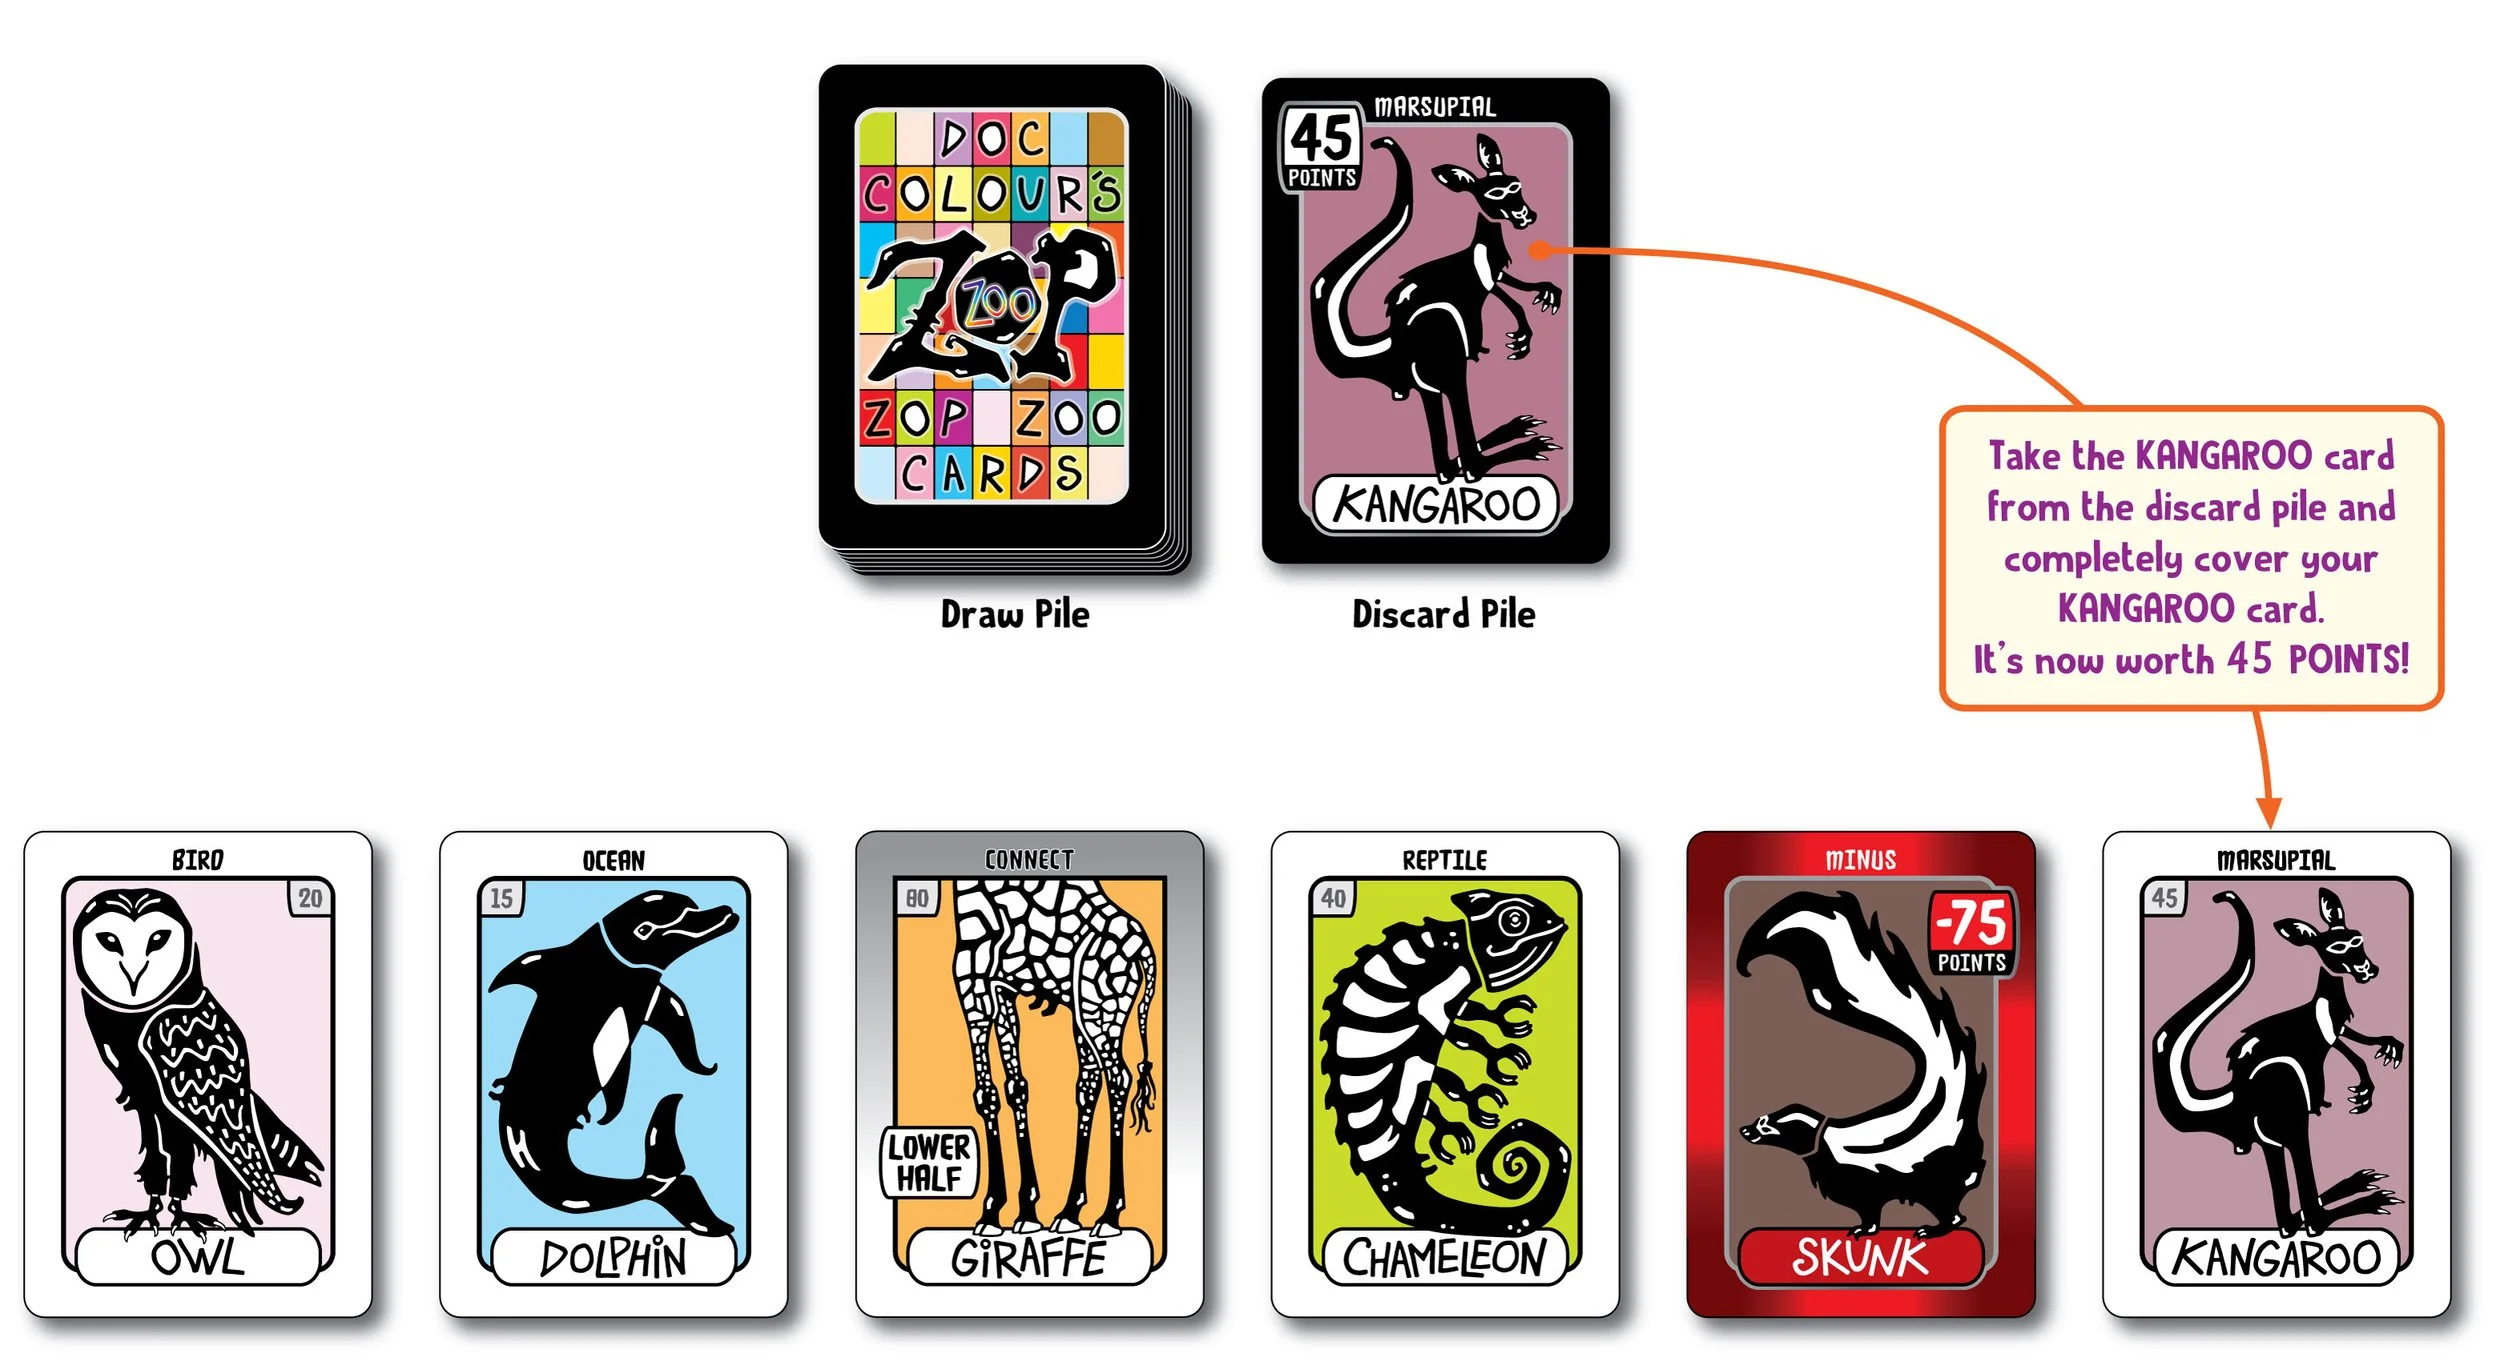
If you can’t match the card, place it face up next to the draw pile...this forms the discard pile.
When a card is discarded, it is available to the next player. If the next player can match that card, they MUST take it, as well as any other matching cards that become revealed underneath it. ~This simply means that matching cards are stacked one on the other (back-to-back matches).
It’s great when this happens, because you get to match more than one card during your turn!
(Revealing one matching card is pretty lucky… revealing two matching cards is super lucky!!!}
After you match any card(s) from the top of the discard pile, YOUR TURN ENDS
(you DON’T get to then pick from the draw pile afterwards)—next player!
REMEMBER: You will either pick a new card from the draw pile OR you will take/use a card from the top of the discard pile… it’s one pile or the other, never both.
KEEP IN MIND: You are matching animal images together… not animal categories. For example, you’re not matching a BIRD card with any other BIRD card, but rather you are matching an OWL card specifically with the other OWL card. *It will help to pay attention to the written name of the animal on the bottom of each card.
Only when you are matching Side Bonus Cards should you focus on the animal category [explained more in the Side Bonus Card Section below] .

The first player to have all of their cards be worth POINTS wins the round! Simply look for the word “POINTS” on all your cards... that’s how you will visually know that each one of your cards is now worth POINTS!
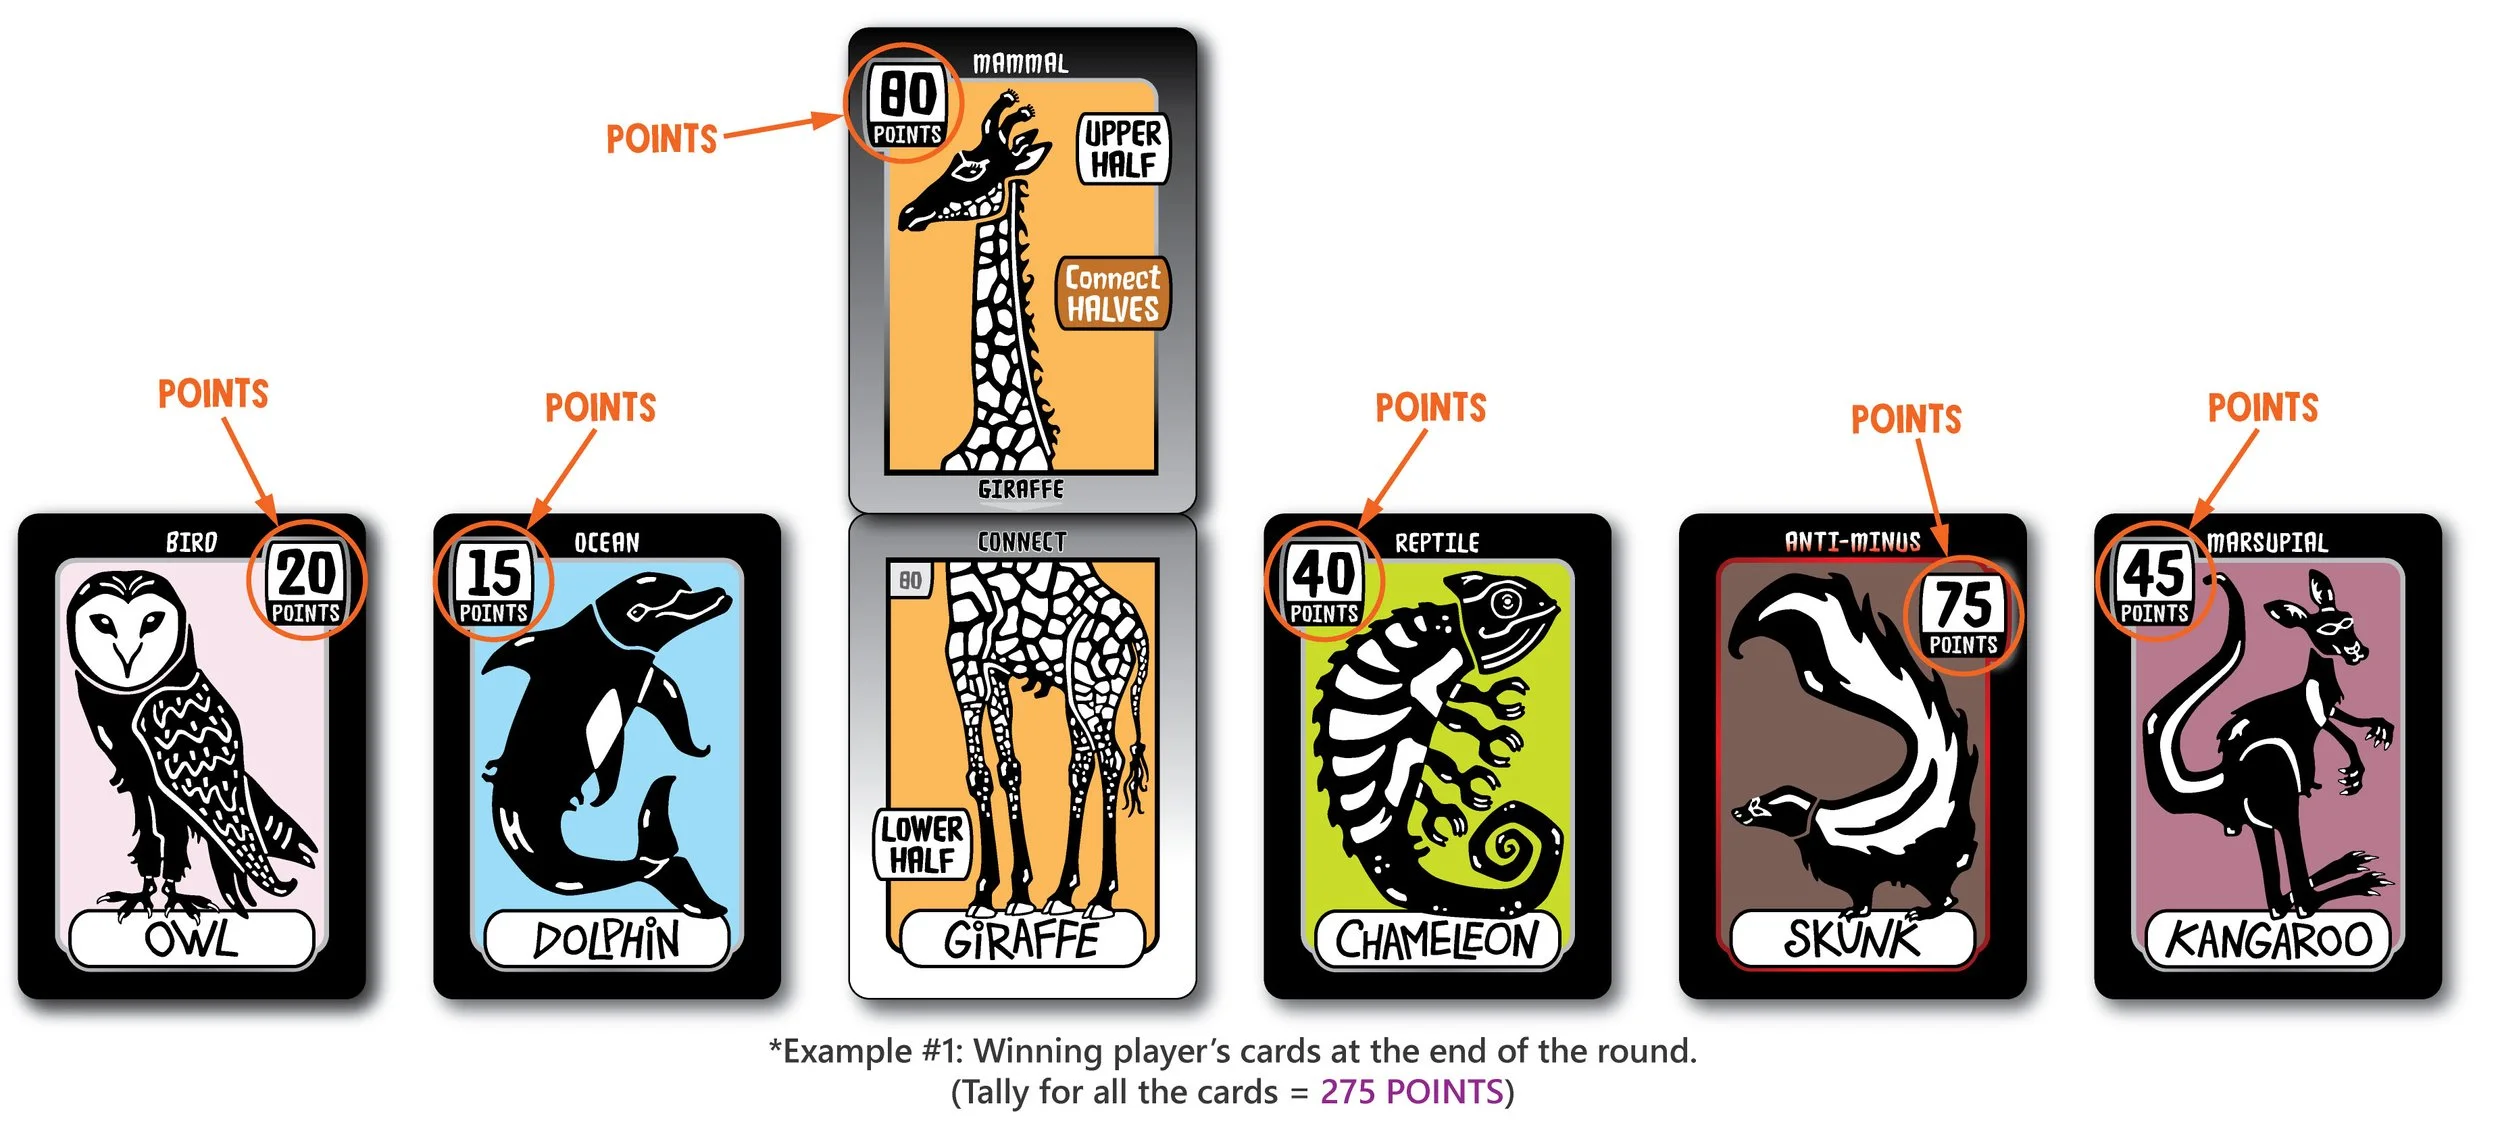
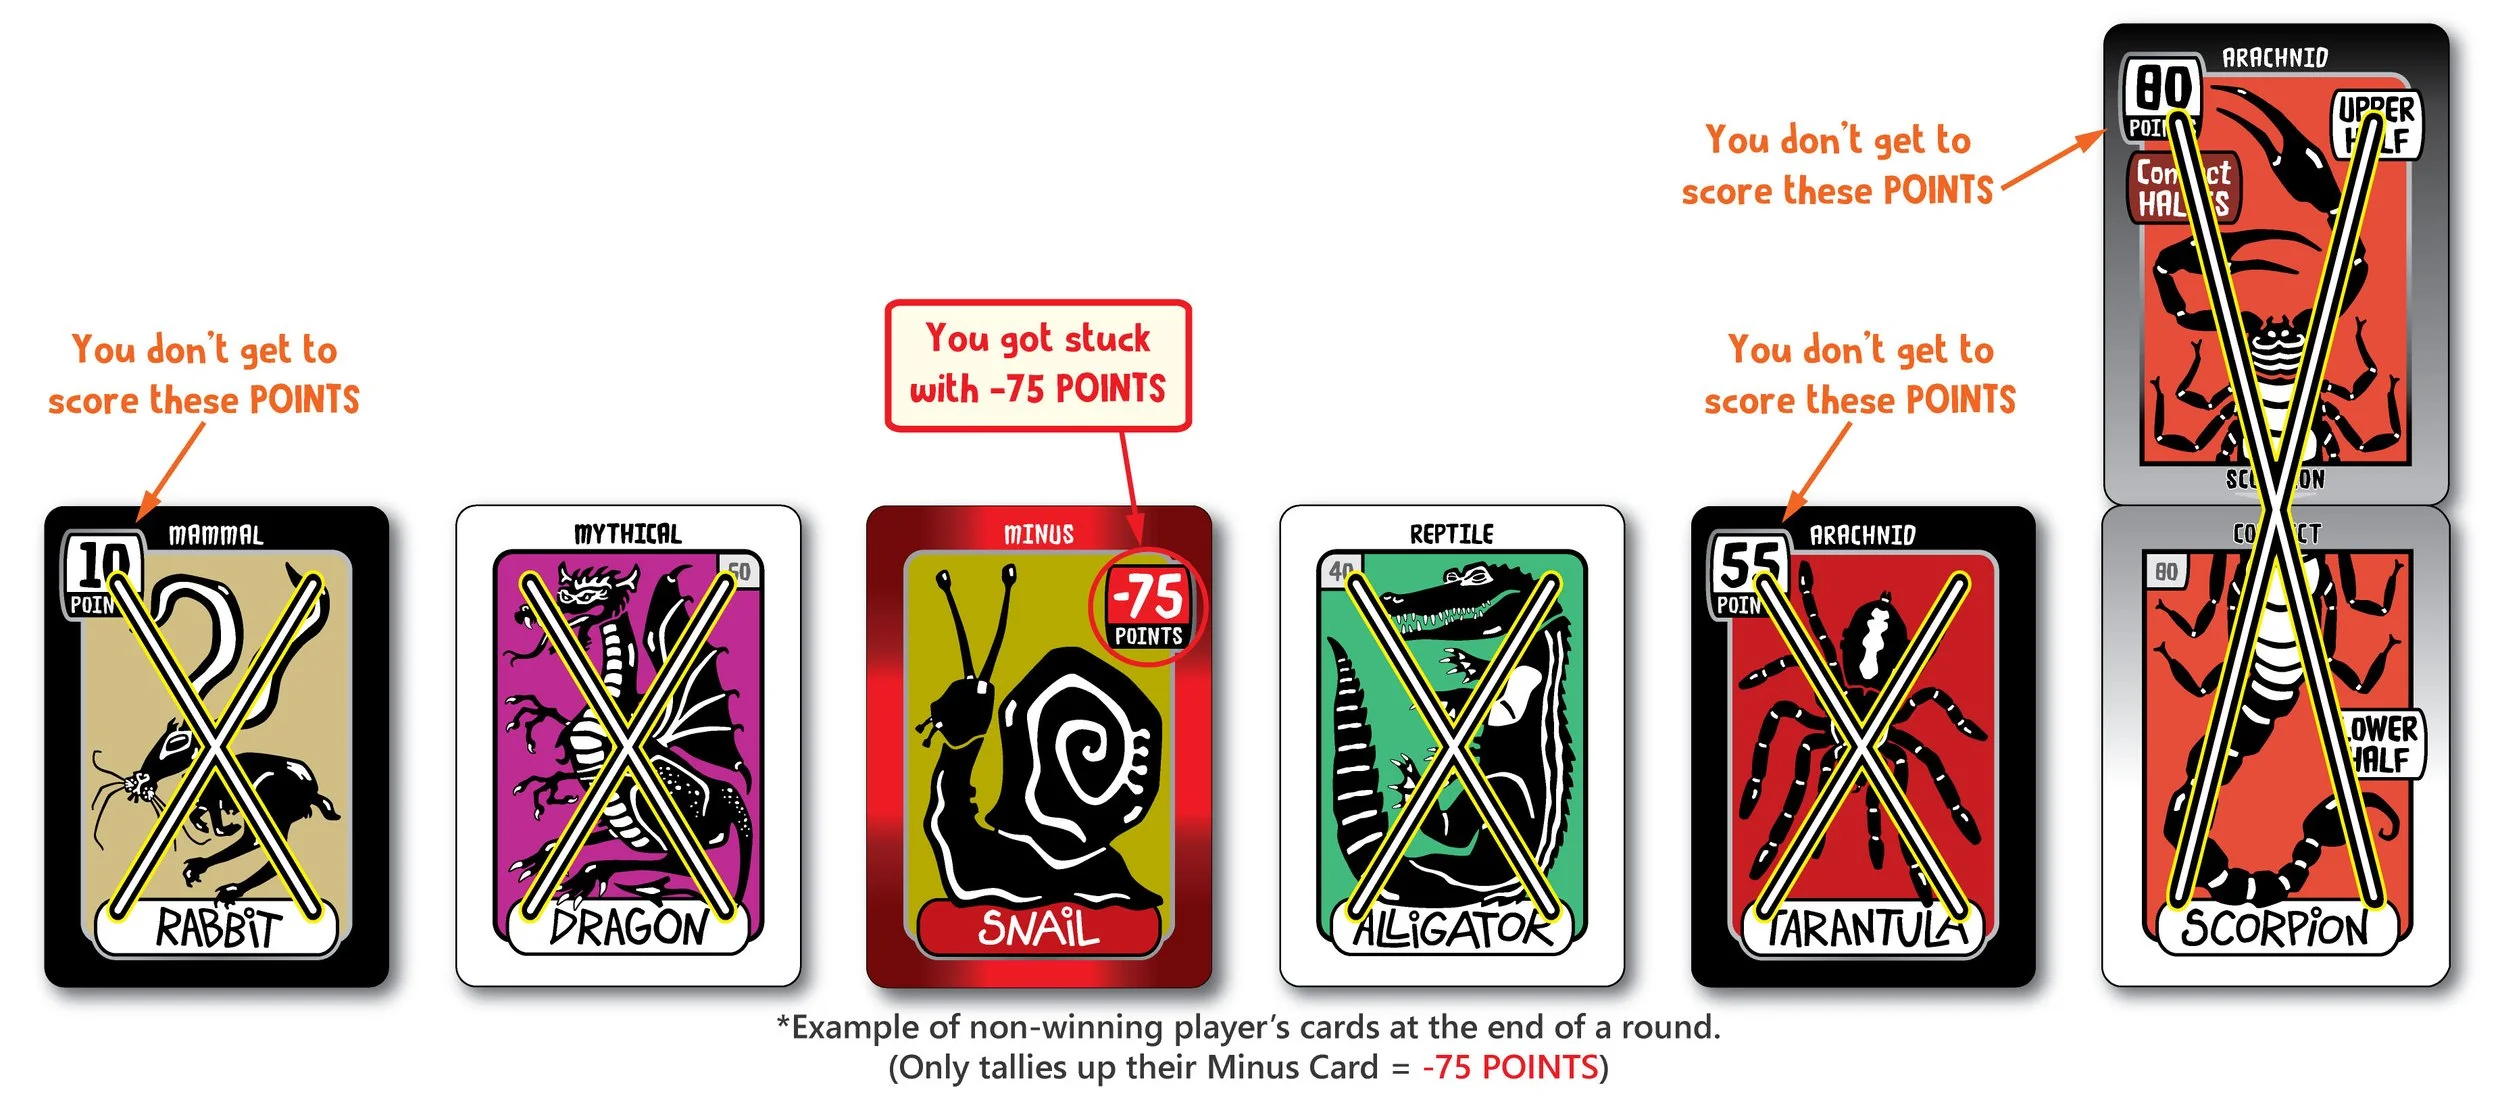
ONLY the winner of the round gets to add up ALL of their POINTS on their cards and score the total.
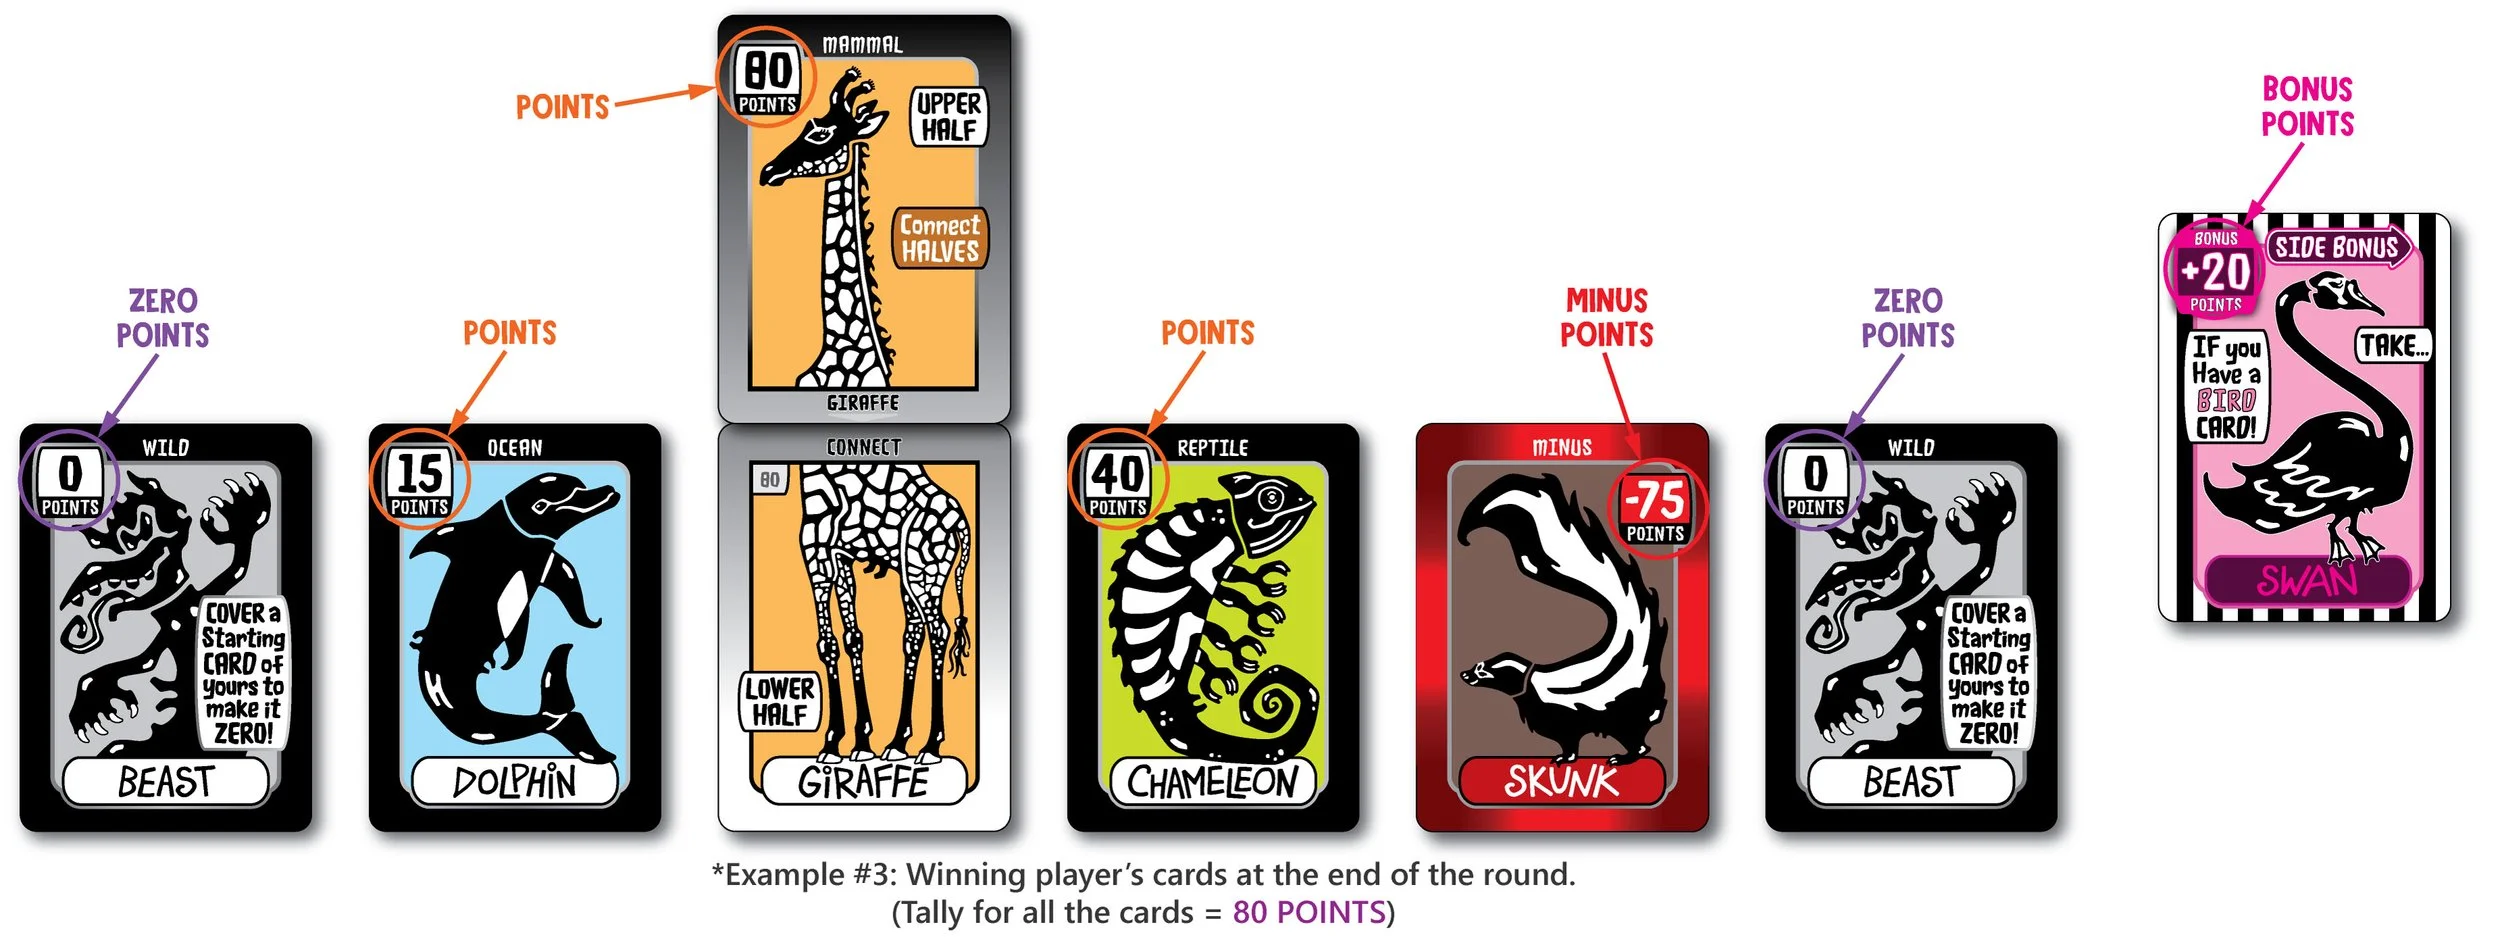
This includes regular POINTS… as well as, minus POINTS, 0 POINTS and also Side Bonus POINTS!
REMEMBER:As soon as a player has POINTS for all their cards, the round instantly ends and they are the winner! Even if they still want to keep playing in order to cover up any Minus Cards that they still might have showing, that’s a no-no… the round is over.
*You will learn about Minus Cards, Wild (BEAST) Cards and Side Bonus Cards further down.
REMEMBER: When you see the word “POINTS” on all of your cards, you win the round!!
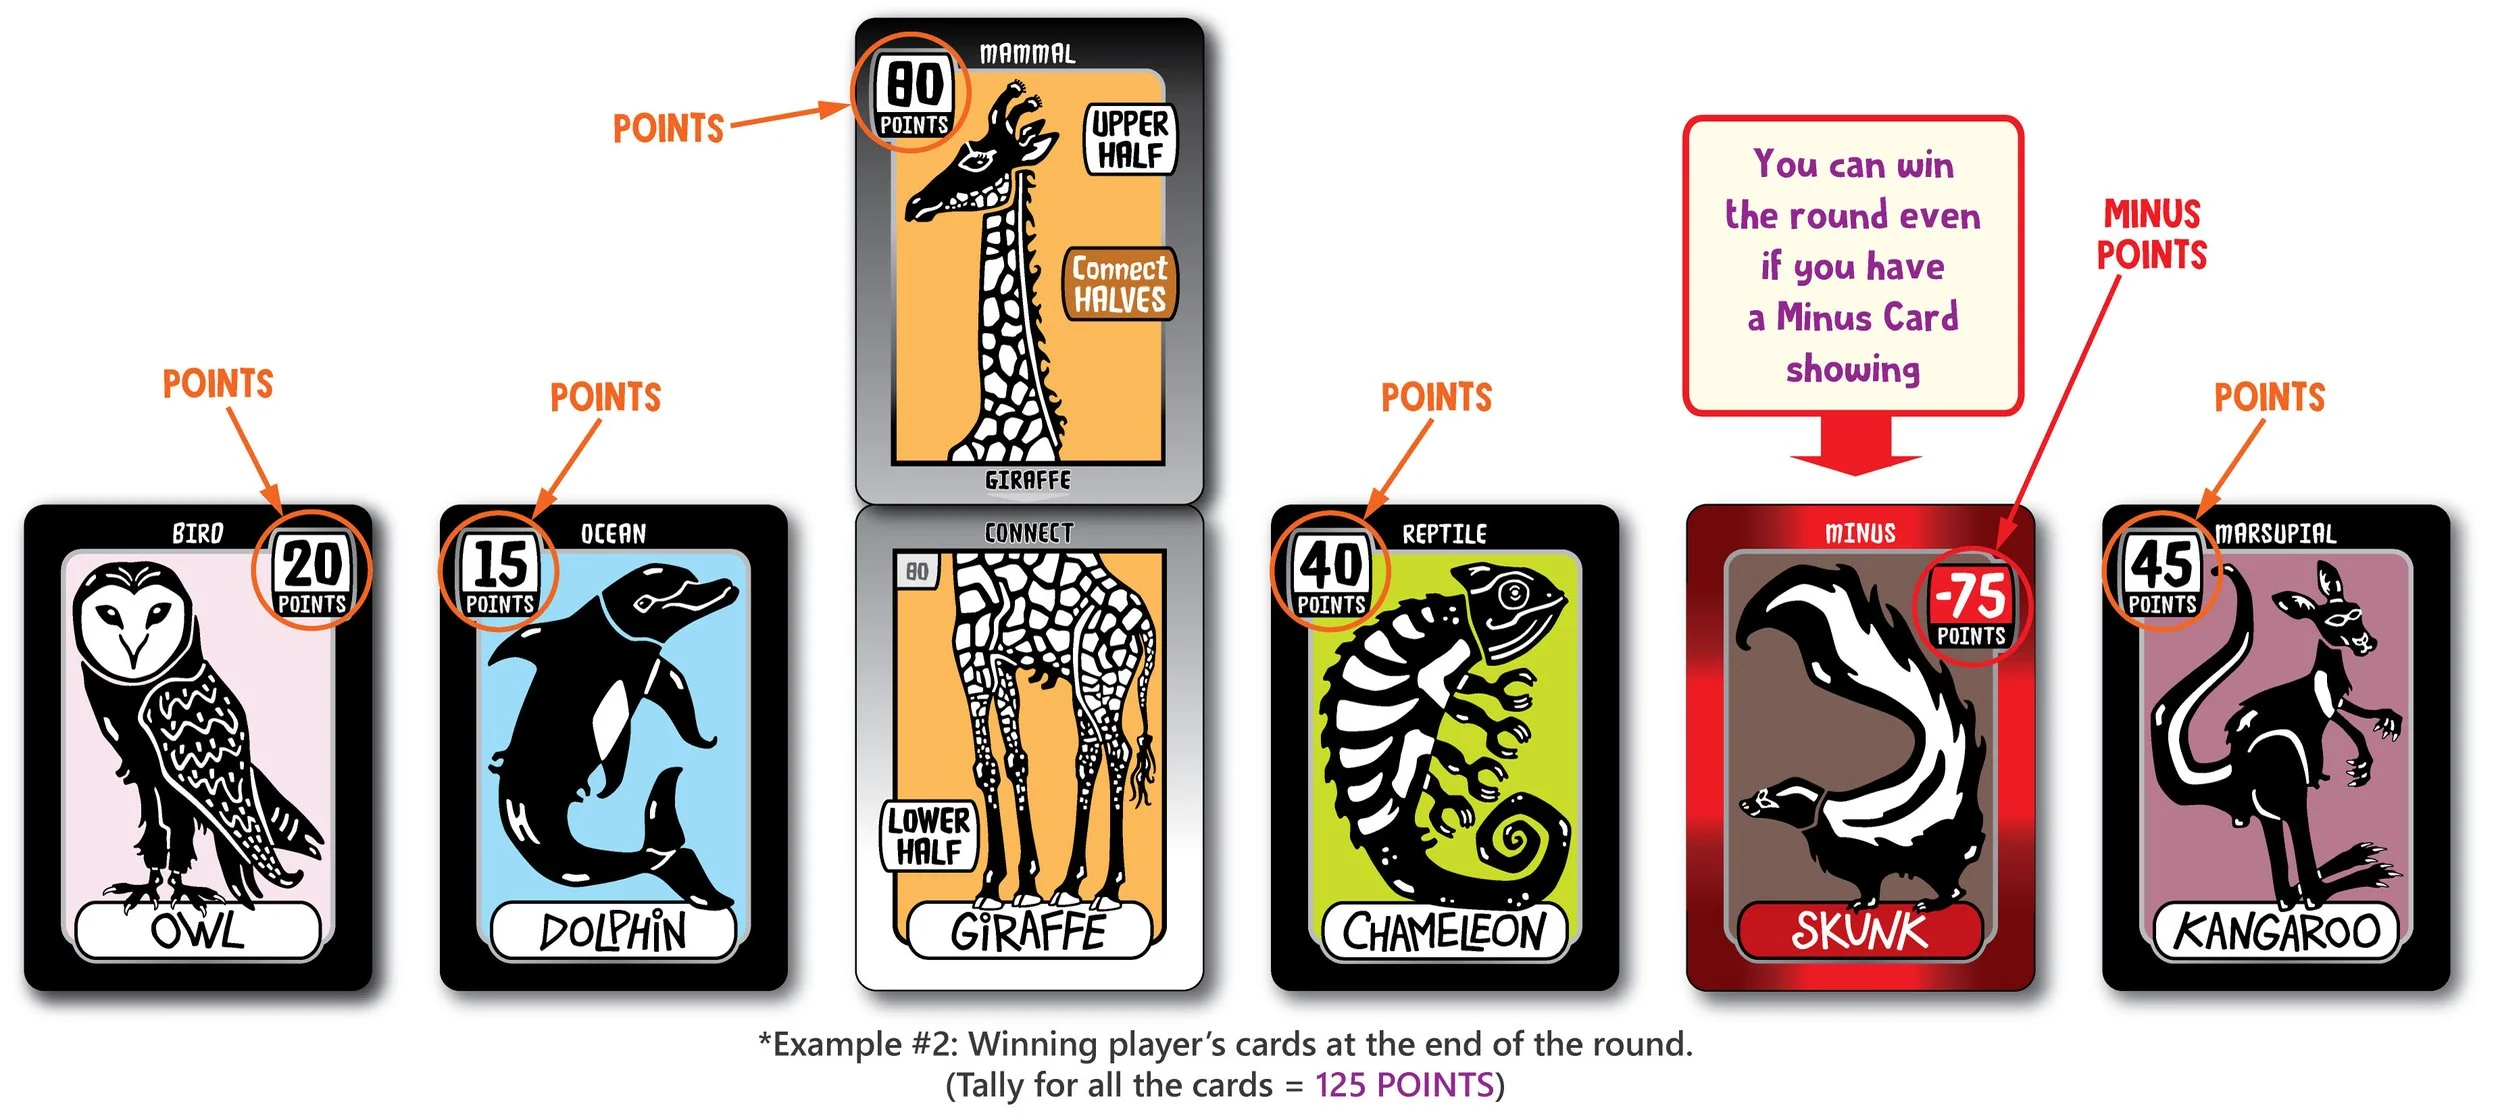
BE AWARE: Even if you win the round, it’s possible to end up with a negative tally if you have MINUS Cards.

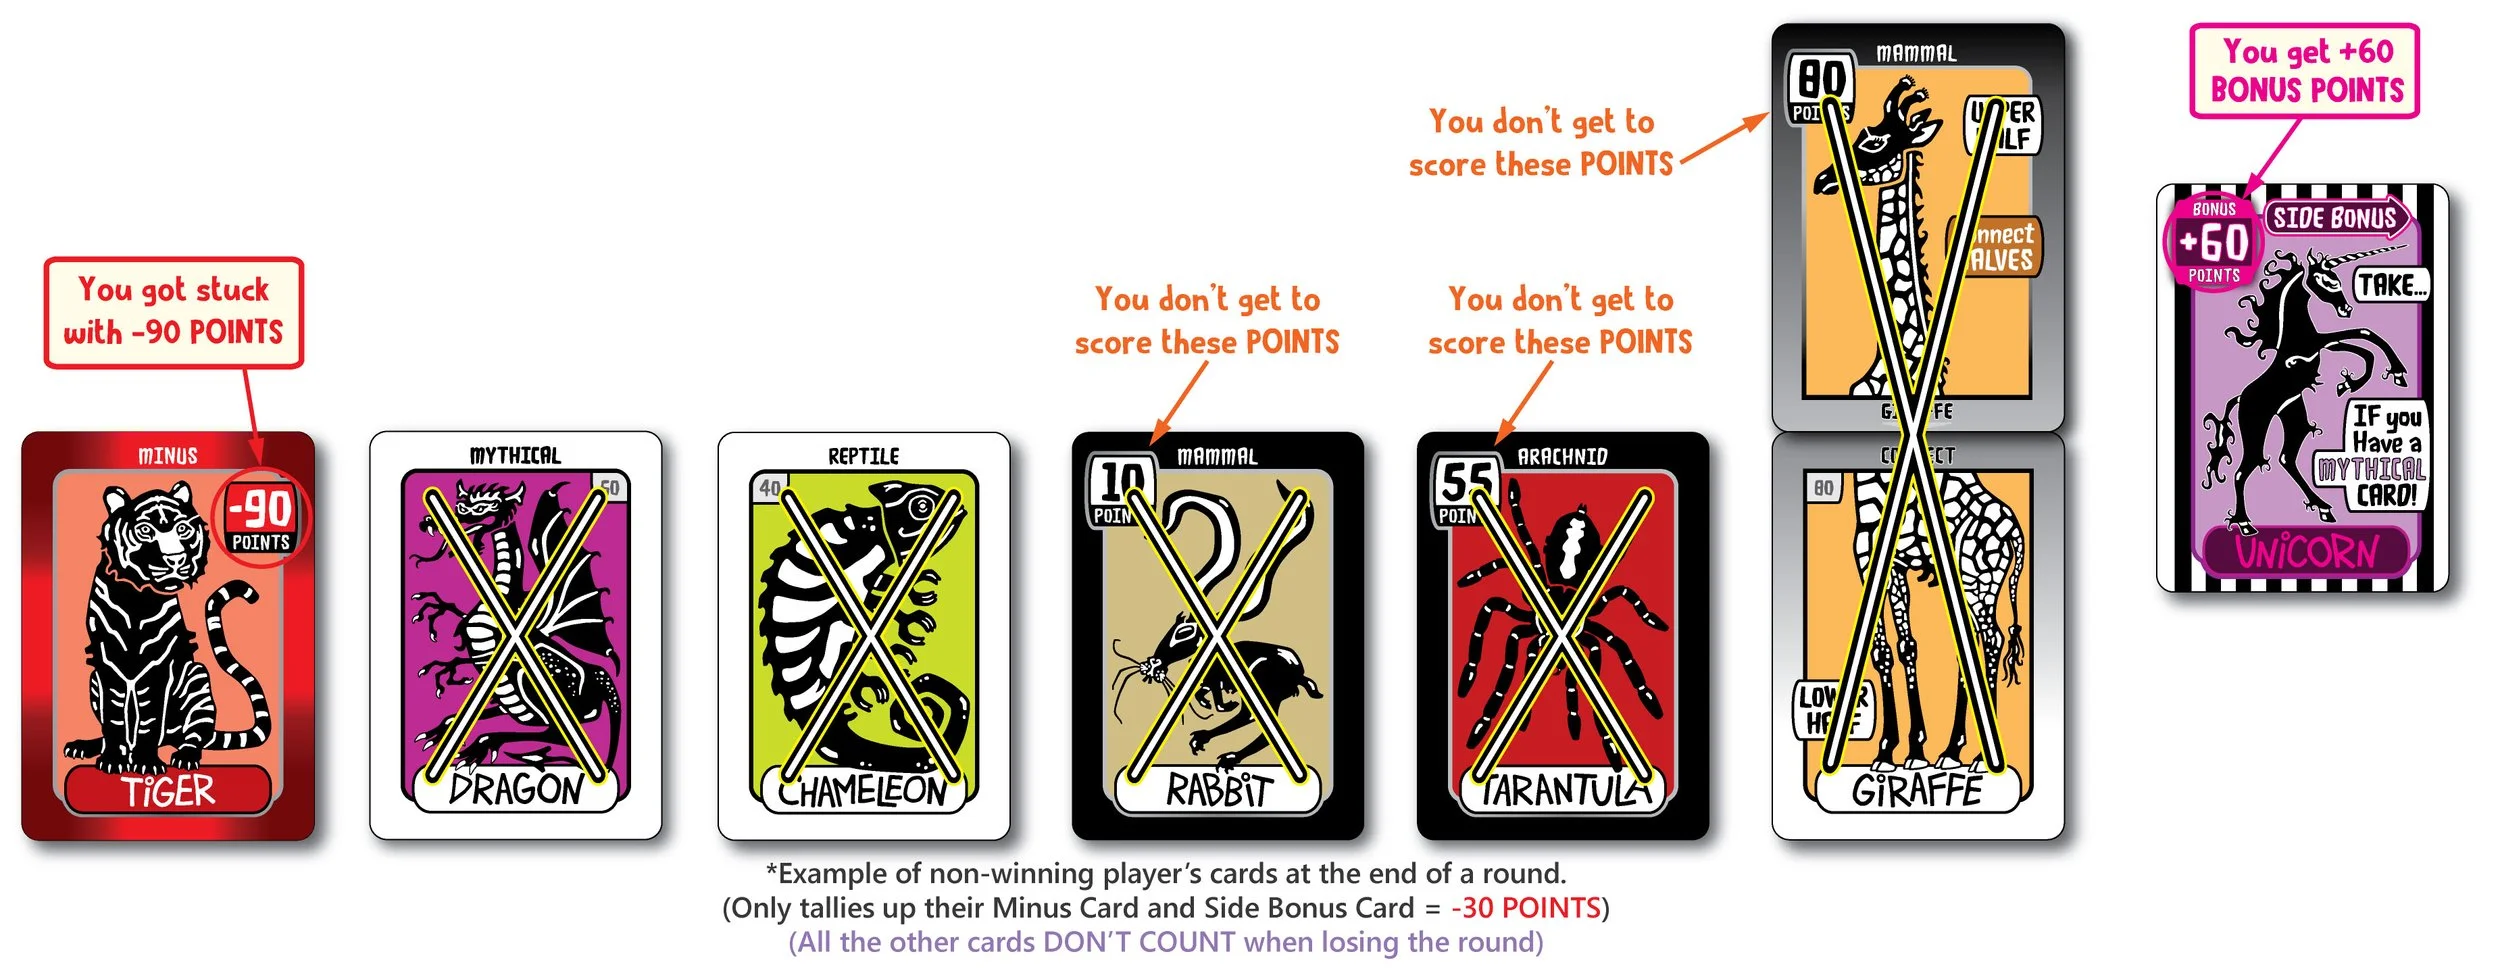
All the other players ONLY add up their minus POINTS and their Side Bonus POINTS
(if they have any) and score just those POINTS.
REGARDING WHEN A PLAYER MISSES MATCHING A CARD
As you know, if you can match a card to one of your starting cards, you MUST take it! Regardless of your card coming from the draw pile or the discard pile, you cannot intentionally decide NOT to take a card that you can match.
So, If a player (for any reason) happens to miss a matching card on top of the discard pile, and they draw a card instead, the next player after them (if they notice the miss) has the power to either:
Have that player put back their drawn card and take their matching card from the discard pile, or
Simply allow it to happen and be fine with the player missing their matching card—HaHa!
Let’s say, you are the next player in this scenario:
The player before you would be drawing the card that you would have drawn.
And if that card is a match for you, your turn would have continued letting you drawing again. But now since your matching card has been discarded by the other player, you still get to match it… but since it’s now being taken from the top of the discard pile (and not from the draw pile), you are deprived being able to draw a second card, with your turn ending.So, basically, if you acknowledge being able to make a match you MUST!
Otherwise, if a match is missed… it’s completely up to the next player to make the call (They have the power).
THAT SAID,
there will be times when you honestly overlook being able to match and (if allowed) you will miss matching your card. If this happens, not to worry… there is a chance for you to be able to “dig” for any missed (passed up) cards during the round. [You will learn more about this in the DIG IN PILE cards section below.]
After the end of each round, all of the cards will need to be re-sorted back into their two separate white and black decks. ~The best way to do this is to simply turn the cards face-down so you can gather the WHITE BORDER cards from the BLACK BORDER cards. Once done, be sure to shuffle each deck thoroughly once again!!
OK...
time to get acquainted with the cards you’ll see in the black deck :)

First, here’s a brief and simplified explanation of every type of card in the black deck:
Category POINTS Cards:
They cover matching Category Cards.
Upper Half Connect Cards:
They connect above Lower Half Connect Cards.
ANTI-Minus Cards:
They cover matching Minus Cards turning them into positive POINTS!
Wild Cards:
BEAST cards (and the BEST BEAST card) cover any of your starting cards of your choosing.
Side Bonus Cards:
They go off to the side of your starting cards. They give you side bonus POINTS that you automatically
get to score at the end of each round (regardless if you lose the round).
Dig In Pile Cards:
MOLE cards let you search through the discard pile for
any of your matching cards that got missed or passed up.
Specialty Cards:
HYENA cards have you give a card worth POINTS to another player.
RACCOON cards have you take a card worth POINTS from another player.
EARTHWORM cards have you switch cards worth POINTS with another player.
*Full explanation of each type of card below

Category POINTS Cards have black borders around them and list an animal category at the top.
Category POINTS cards are the most common cards in the black deck.
They match with Category Cards making them worth POINTS. There are 36 of these animal cards in the black deck, and they display the exact same animal illustration on the cards in the white deck.
REMEMBER: Category Cards (from the white deck) only show an indicated point value on them. But Category POINTS Cards (in the black deck) prominently show actual POINTS!
NOTE: When any of your Category Cards get covered with a card from the black deck, it’s white border will now have a black border card on top of it. SO, this is a good visual indicator of knowing how your round is going: the more cards you see that have black borders in your starting cards… the closer you are getting to matching all your cards and winning the round!

ANTI-Minus Cards have black borders around them and have the word ANTI-MINUS at the top.
There are 5 different animals on Minus Cards/Anti-Minus Cards:
The SNAIL and SKUNK cards are -75/75 POINTS.
The TIGER and LION cards are -90/90 POINTS.
The TYRANNOSAURUS cards are -100/100 POINTS.
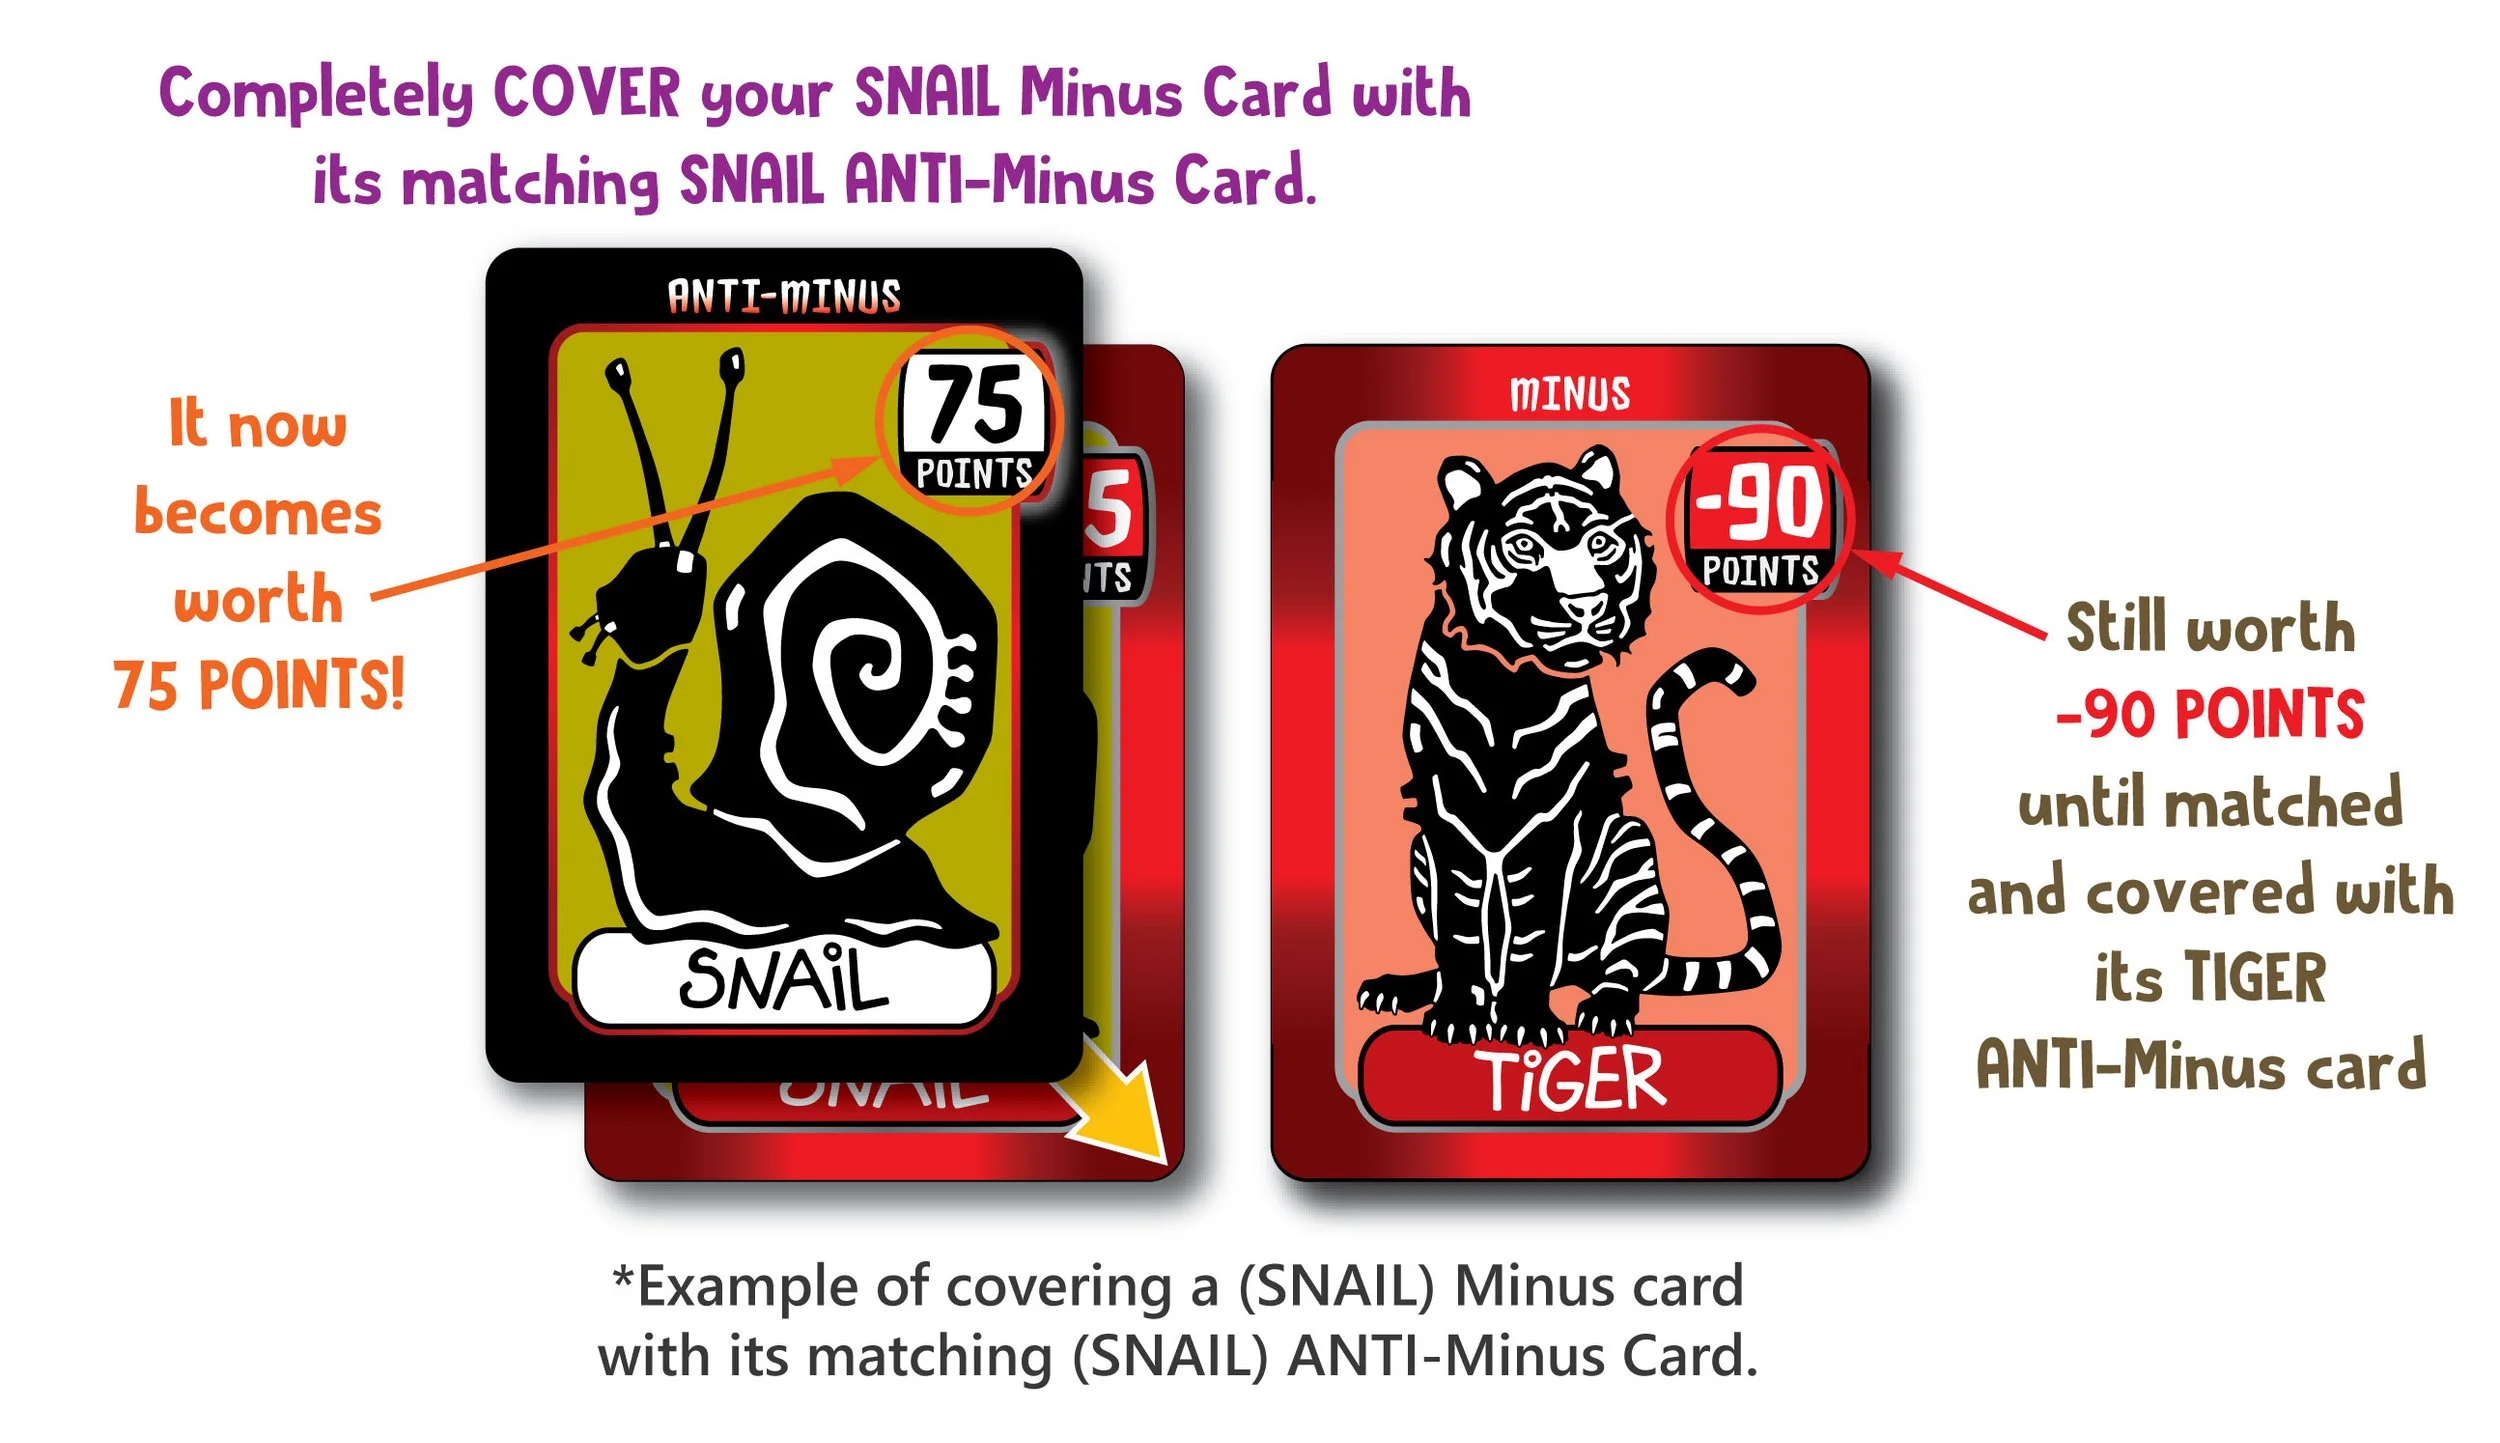
ANTI-Minus Cards match the same animal illustrations on Minus Cards, turning their minus POINTS into positive POINTS... once covered!
If you have a Minus Card, it’s already showing POINTS! Minus Cards don’t need to be matched in order for you to win the round. In other words, this is one less starting card that you need to cover to make it worth POINTS… since it’s already worth POINTS.
HOWEVER, you will most surely want to have your Minus Card(s) covered with their matching ANTI-Minus Card to turn them into positive POINTS before the end of the round! BECAUSE, at the end of each round, all players stuck with any Minus Card(s) that didn’t get covered have to subtract that card’s minus POINTS from their scores – tisk tisk!
REMEMBER: In order to score POINTS from your ANTI-Minus Cards… you MUST win the round.
NOTE: Minus Cards and Anti-Minus Cards do not have an animal category on top of their cards.
DURING THE ROUND IF YOU HAVE A MINUS CARD IN YOUR HAND…
there are a 7 possible outcomes that can happen:
You will cover it with its matching ANTI-Minus Card, turning it into positive POINTS.
You will cover it with a BEAST Wild Card, thus turning it into 0 POINTS.
You will cover it with a BEST BEAST Wild Card, thus turning it into 50 POINTS.
You will use a HYENA Specialty Card and give it to another player.
A RACCOON Specialty card will be used by another player to take it from you.
An EARTHWORM Specialty Card will be used to switch it with another player’s card.
Or you will get stuck with it at the end of the round and score yourself MINUS POINTS.
So, now you know Minus Cards can be covered by
any Wild Card and they can also be
given, taken and switched by a Specialty Card task.
*You will learn more about Wild Cards and Specialty Cards below.

Upper Half Connect Cards have blended gray-to-black borders around them.
There are 10 different animals you can connect together.
When Connect Cards are matched, they will always be worth 80 POINTS.
If you pick the UPPER HALF of an animal, look to see if you have the LOWER HALF of the same animal in your starting cards. If so, connect both halves together (card edge to card edge) to form the entire elongated animal.
Only the UPPER HALF Connect Cards list an animal category at the top of each card (the LOWER HALF Connect Cards don’t).
So, you must match you Lower Half Connect Cards FIRST before you can collect a Side Bonus Card for their category.
REMEMBER: Connect Cards DO NOT cover each other, they connect with each other!
KEEP IN MIND: Only Upper Half Connect Cards and Category Cards (with their matching Category POINTS Cards) list an animal CATAGORY on the top of each card. All the other types of cards in the black deck do not. This will be a notable factor when you learn about Side Bonus Cards - explained below.

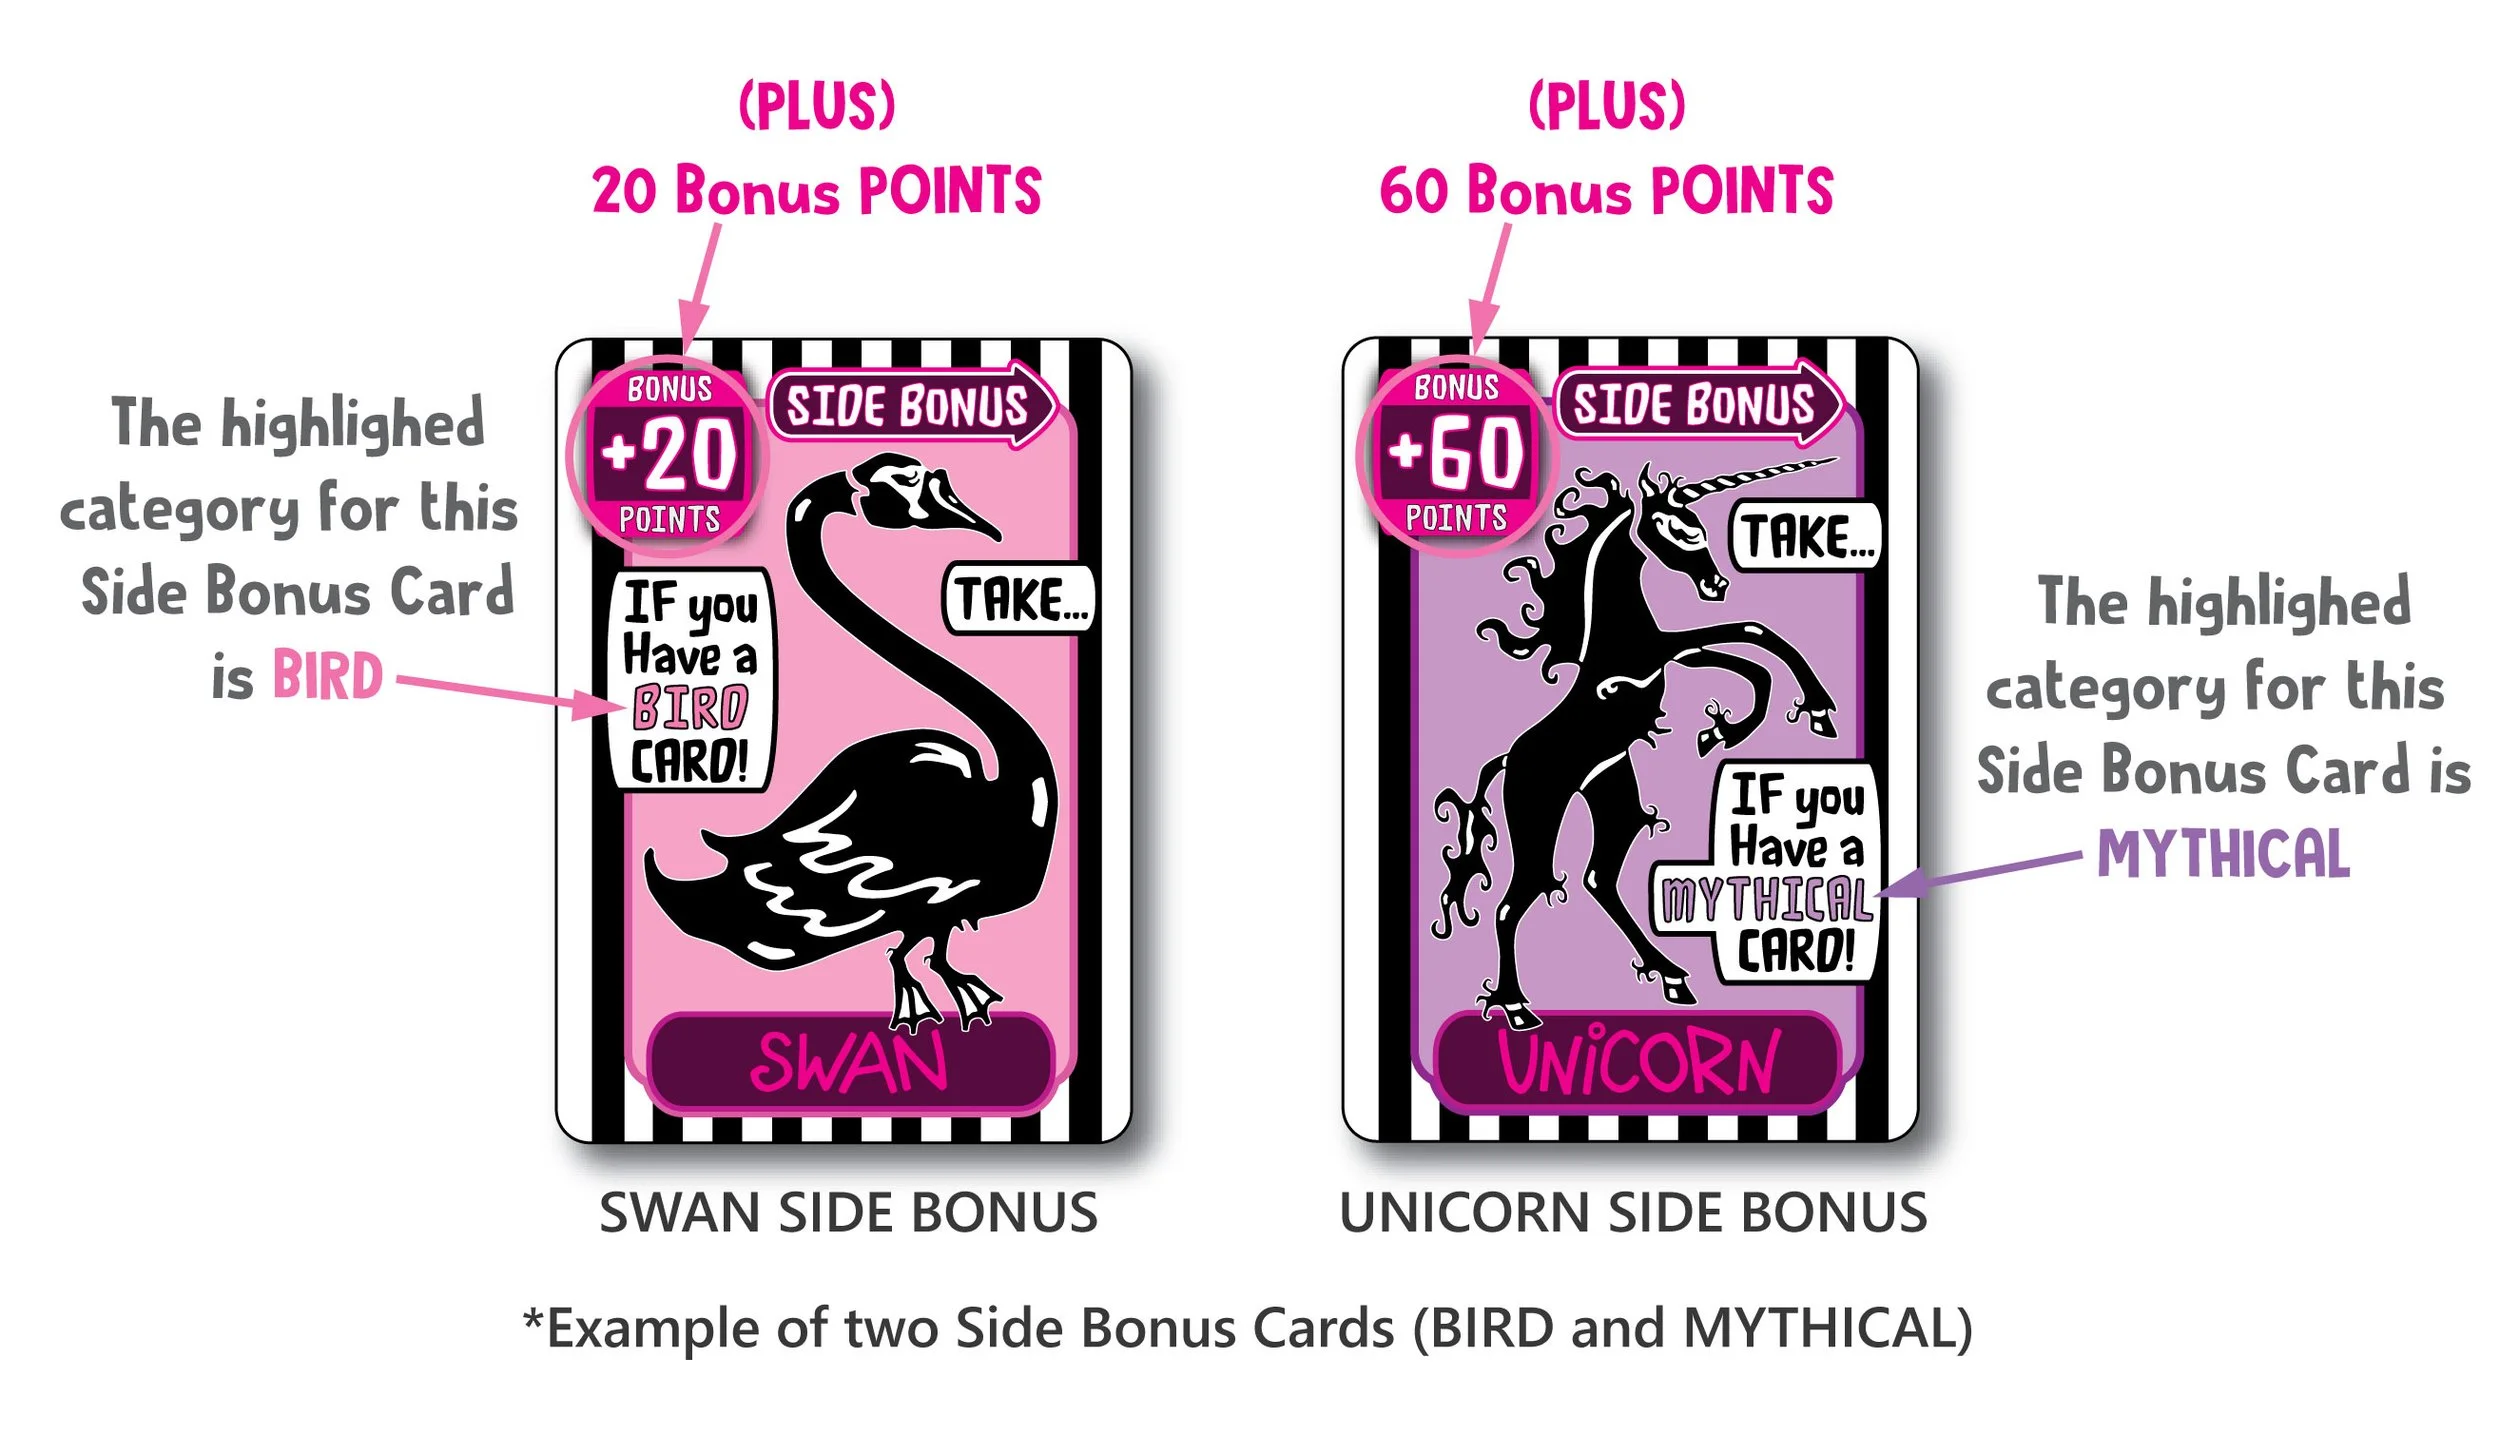
Side Bonus Cards have black & white striped borders around them and
say SIDE BONUS at the top (within an outlined arrow shape pointing to the right).
There are 8 unique Side Bonus Cards.
They are all worth POINTS… bonus POINTS!
Each Side Bonus Card highlights a specified animal category on them:
OCEAN / BIRD / INSECT / SEMI-AQUATIC / HORNS / REPTILE / ARACHNID / MYTHICAL
(there are no MAMMAL or MARSUPIAL Side Bonus Cards… just cuz)
When you draw a Side Bonus card from the draw pile, check the top of your cards to see if any of them match that same specified animal category. If any do, TAKE the Side Bonus Card and place it off to the side of your starting cards to be added to your score at the end of the round - draw again.
If you can’t match it, discard it - it’s now available to the next player. If the next player can’t match the discarded Side Bonus Card - they just simply draw.
If you can match a Side Bonus Card from the discard pile, TAKE it and place it to the side of your starting cards - your turn then ends.
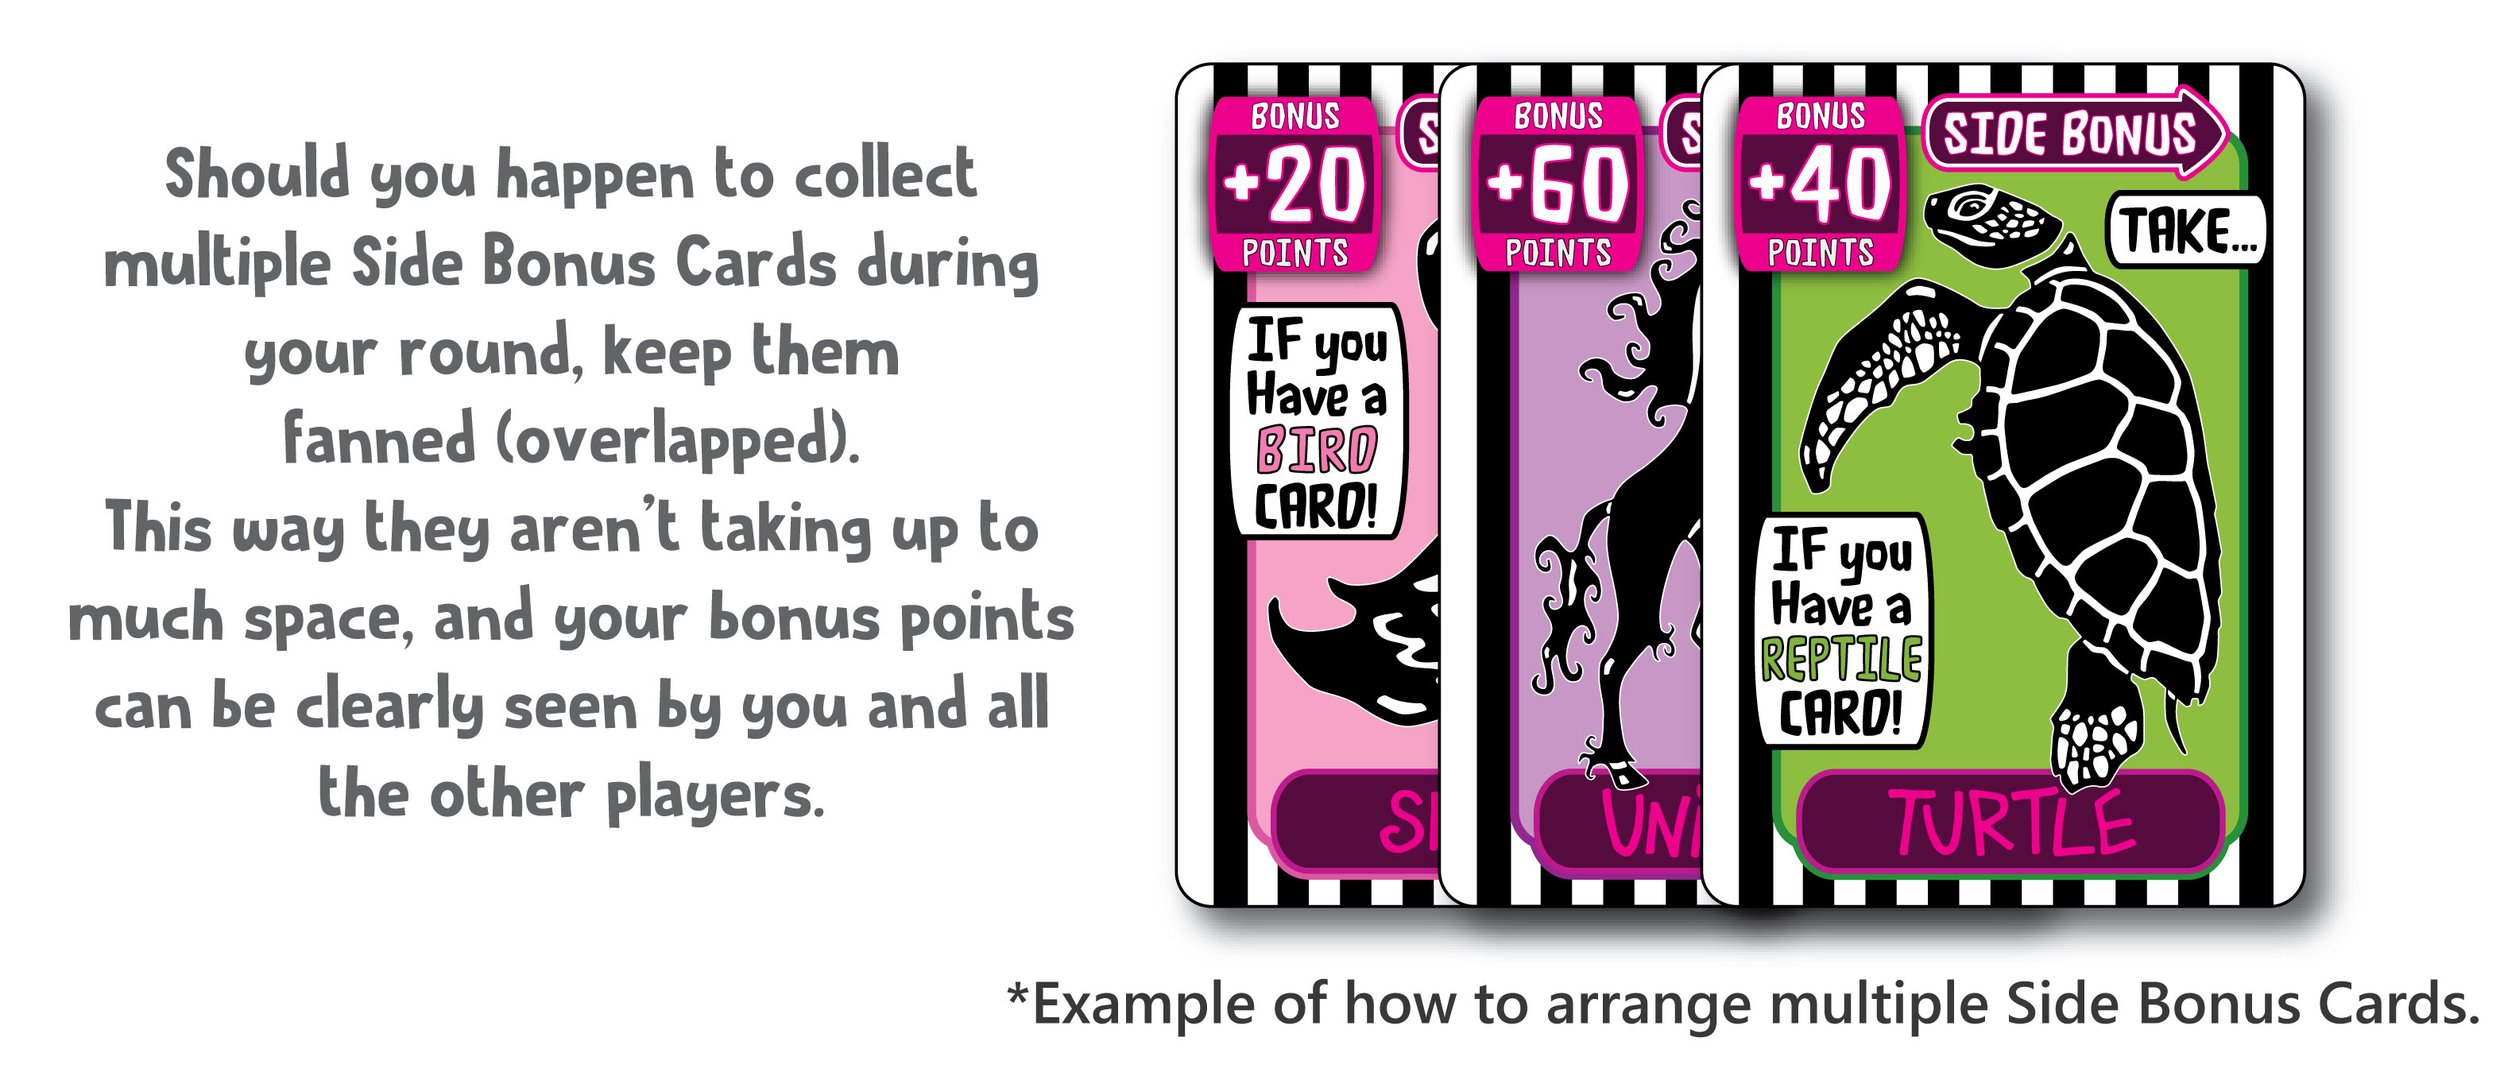
EVEN IF YOU LOSE THE ROUND…
each Side Bonus Card you collect (and hold on to) is always worth guaranteed bonus POINTS that you get to
add to your score at the end of the round - Yay!
REMEMBER: Just check for the animal CATEGORY (not the animal name or anything else).
ALSO REMEMBER: Side Bonus Card DO NOT COVER any of your starting cards… they GO TO THE SIDE of your starting cards.
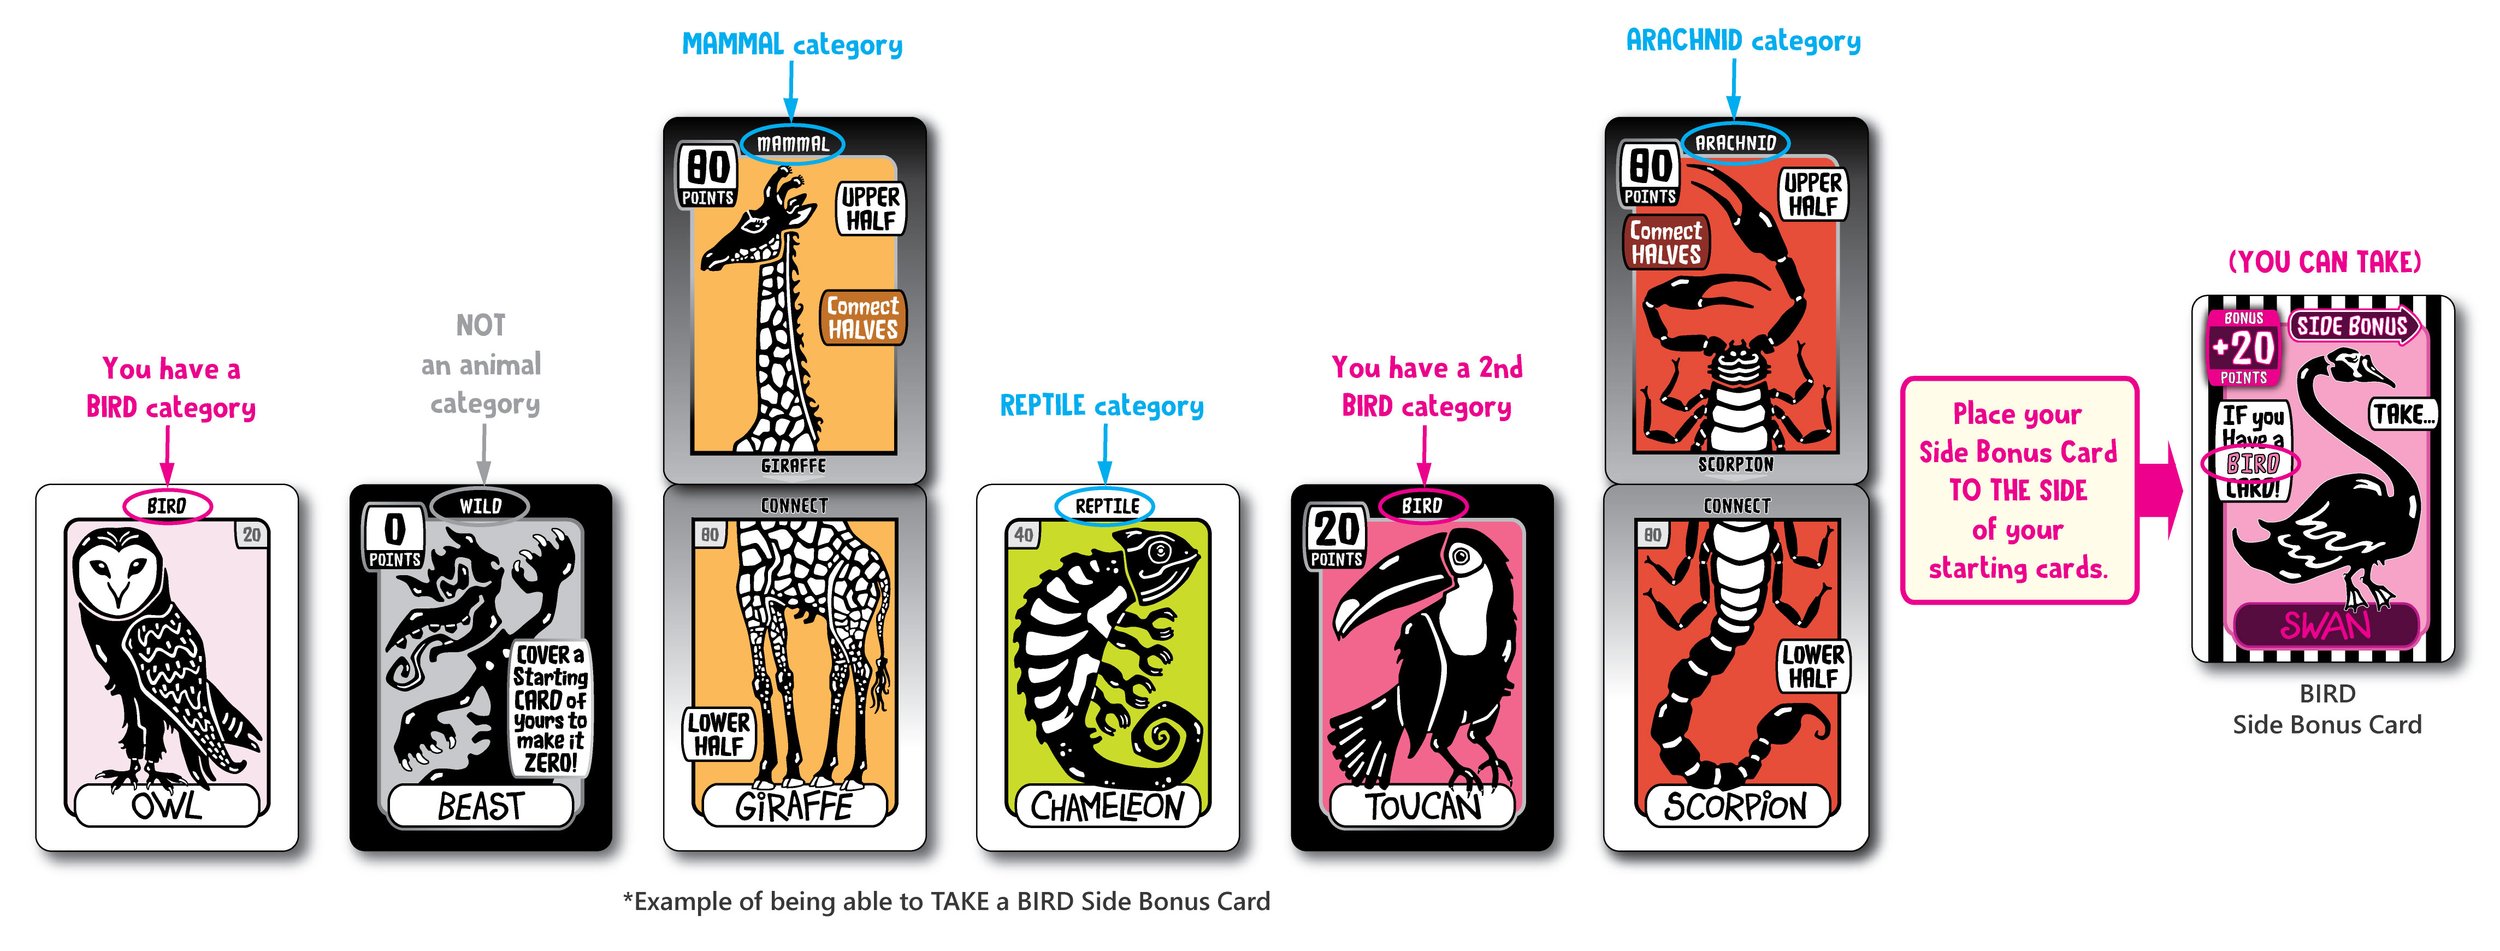
NOTE: You only need one of your cards to match the category in order to TAKE a Side Bonus Card. If you happen to have more than one of your cards matching the category, it makes no difference – it just takes one matching card to be able to TAKE a Side Bonus Card (if no cards match… discard the Side Bonus Card).
KEEP IN MIND: Only Category Cards, Category POINTS Cards, and Upper Half Connect Cards have categories listed on the top of them.
(Lower Half Connect Cards, Minus Cards, ANTI-Minus Cards, Wild Cards, and Dig In Pile Cards DO NOT have a category listed on the top of them. So, these cards do not apply to Side Bonus Cards.)
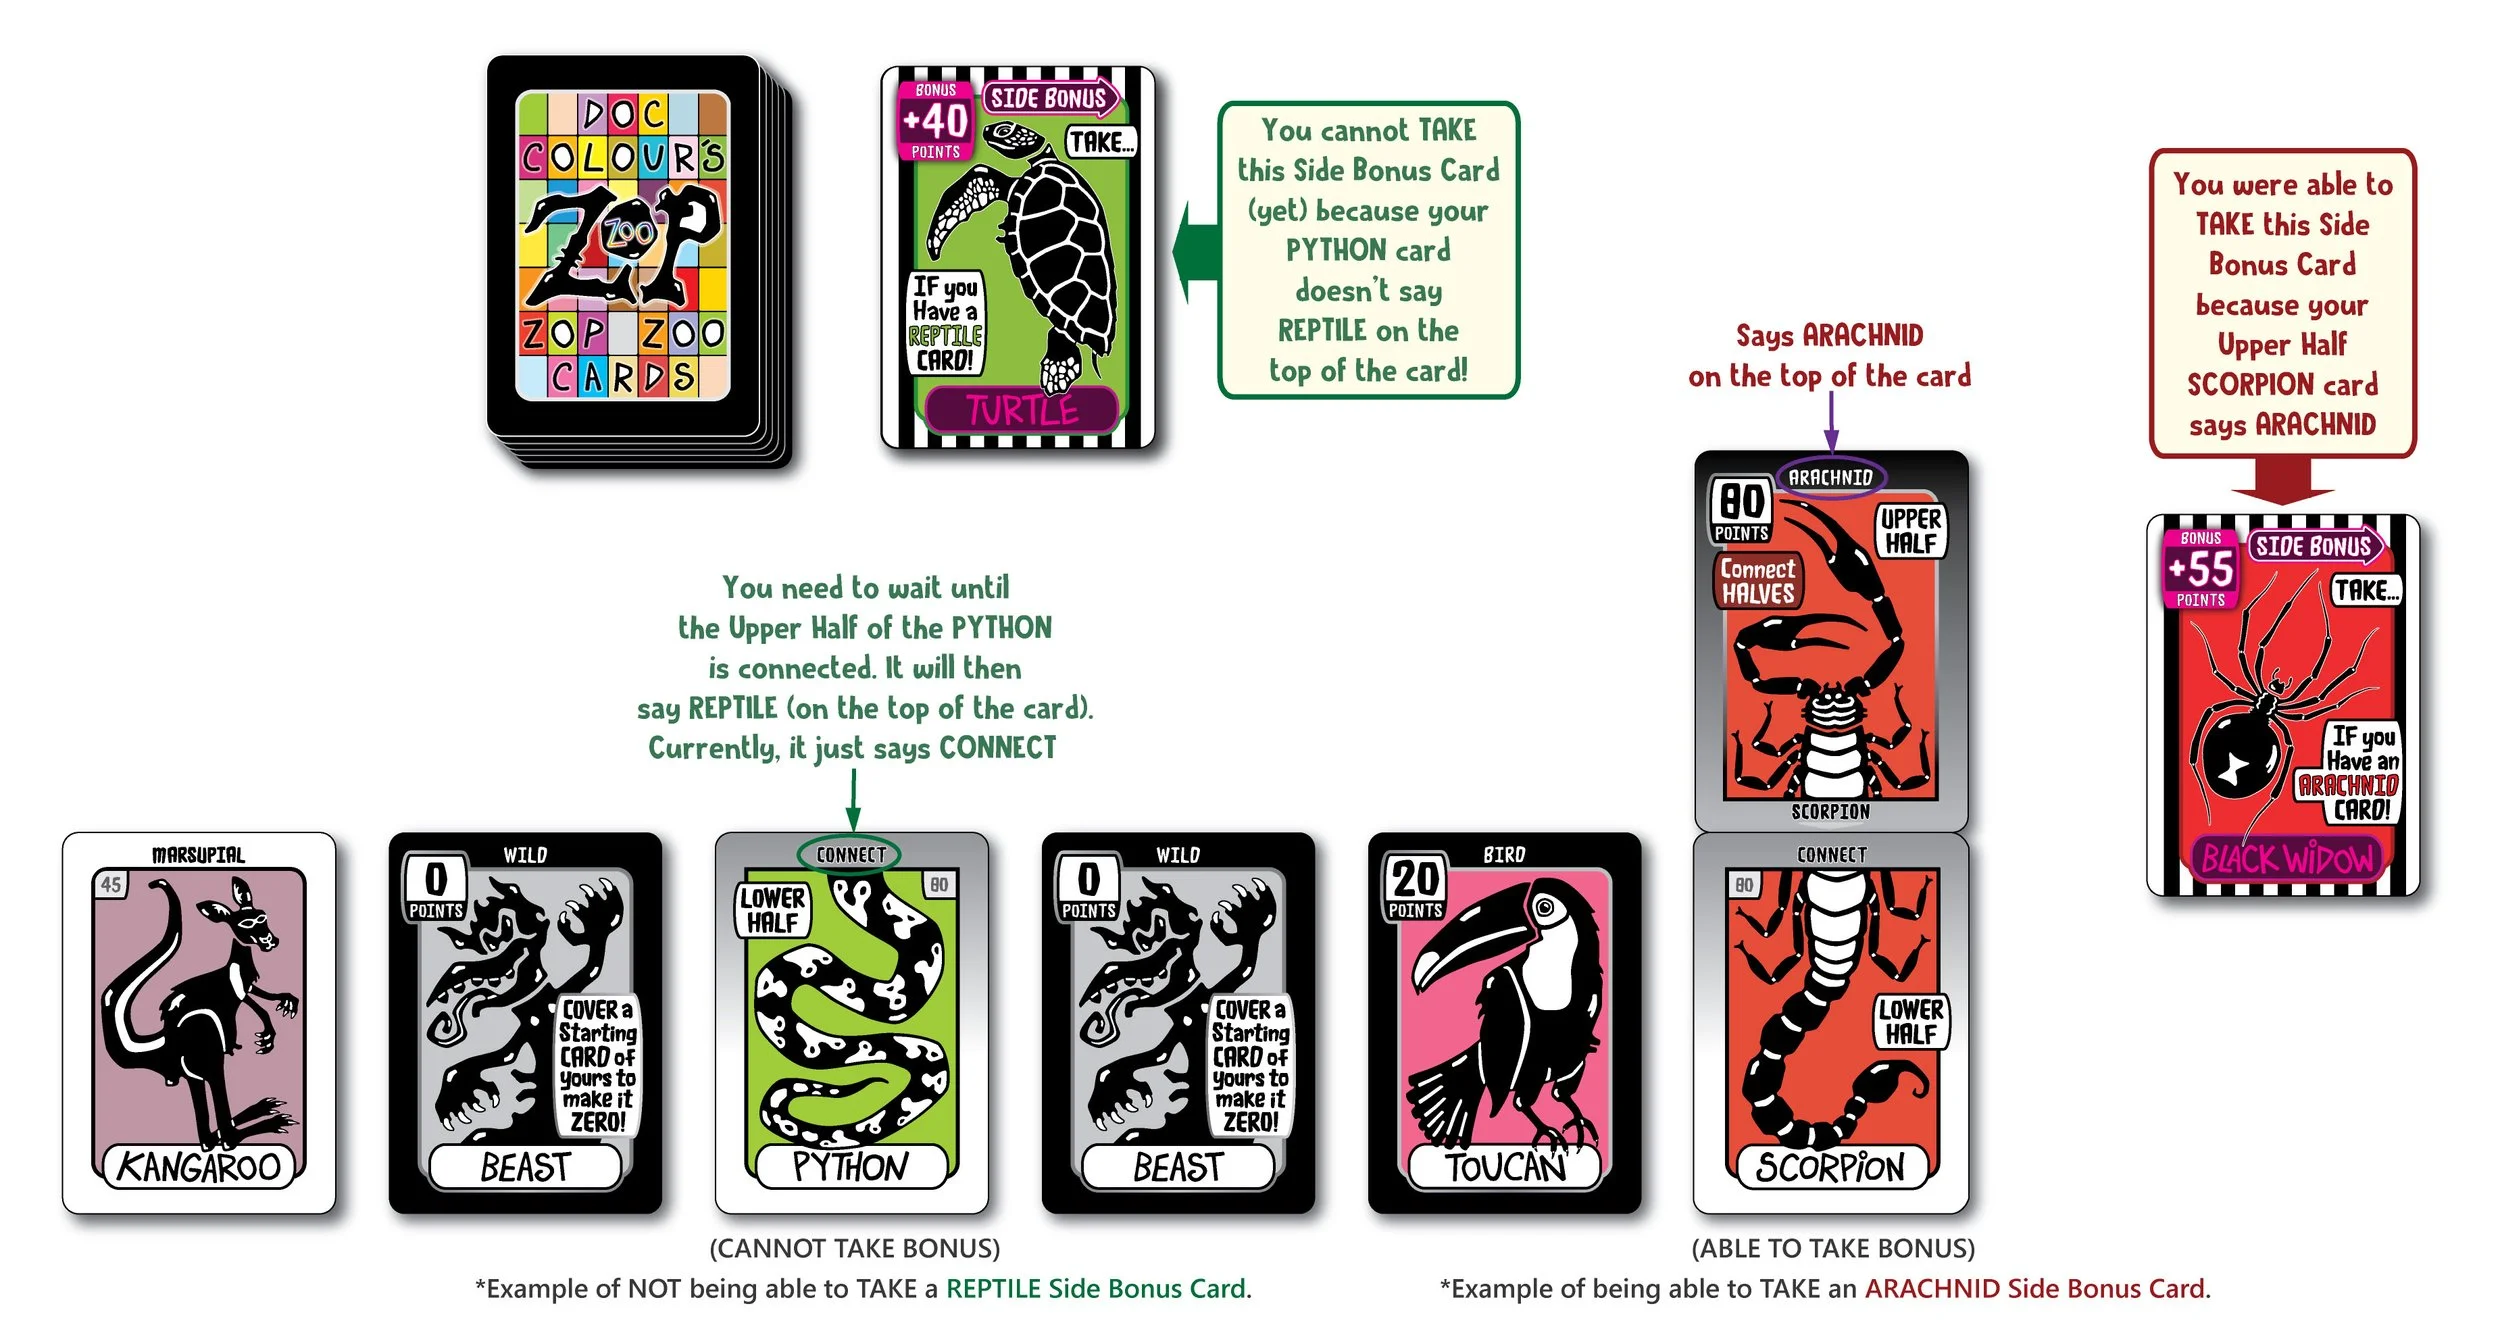
Regarding the example above,
If the UPPER HALF of the PYTHON card gets burried in the discard pile, not to worry… you may have a chance to “dig for it” later in the round by using a MOLE card! That is, if it doesn’t get claimed by another player first.
[Learn more about MOLE cards below]
REMEMBER: Side Bonus Cards can be switched, taken, or given when performing a Specialty Card task.

Wild Cards have black borders around them and have the word WILD at the top.
There are 2 kinds of Wild Cards:
BEAST cards that are worth 0 POINTS (there are 4 BEAST cards), and
a BEST BEAST card that is worth 50 POINTS (there is only 1 BEST BEAST card)
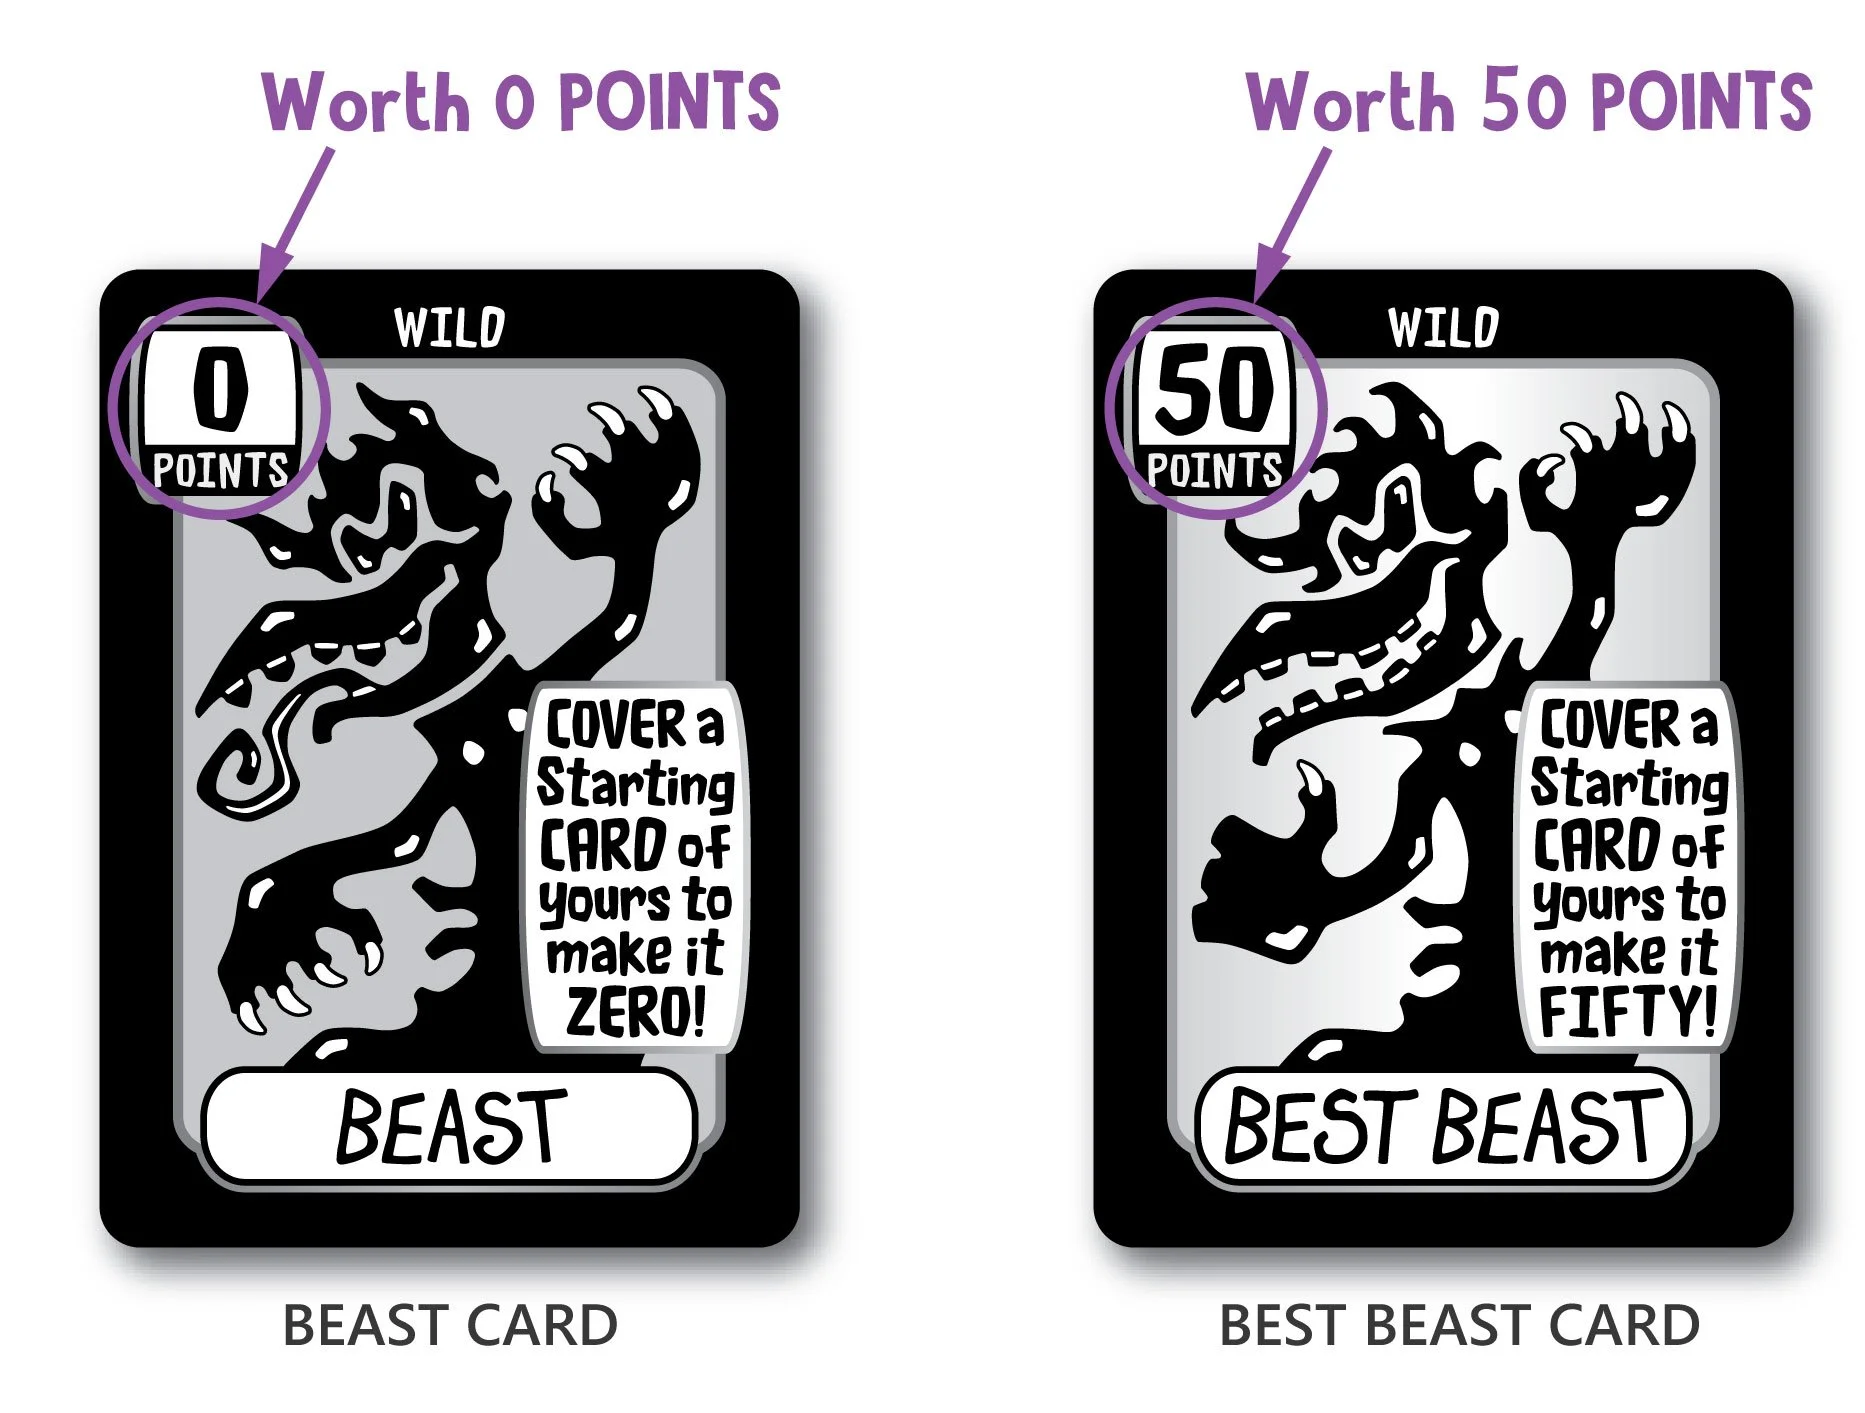
When either Wild Card is drawn, you MUST place it over one of your starting cards.
Once you decide which starting card to cover, it is now worth the POINTS showing on the Wild Card (0 or 50).
Your turn always continues after placing a Wild Card (they are NEVER discarded) – draw again.
KEEP IN MIND: You will always draw again after drawing a Wild Card… unless you just won the round! ;)
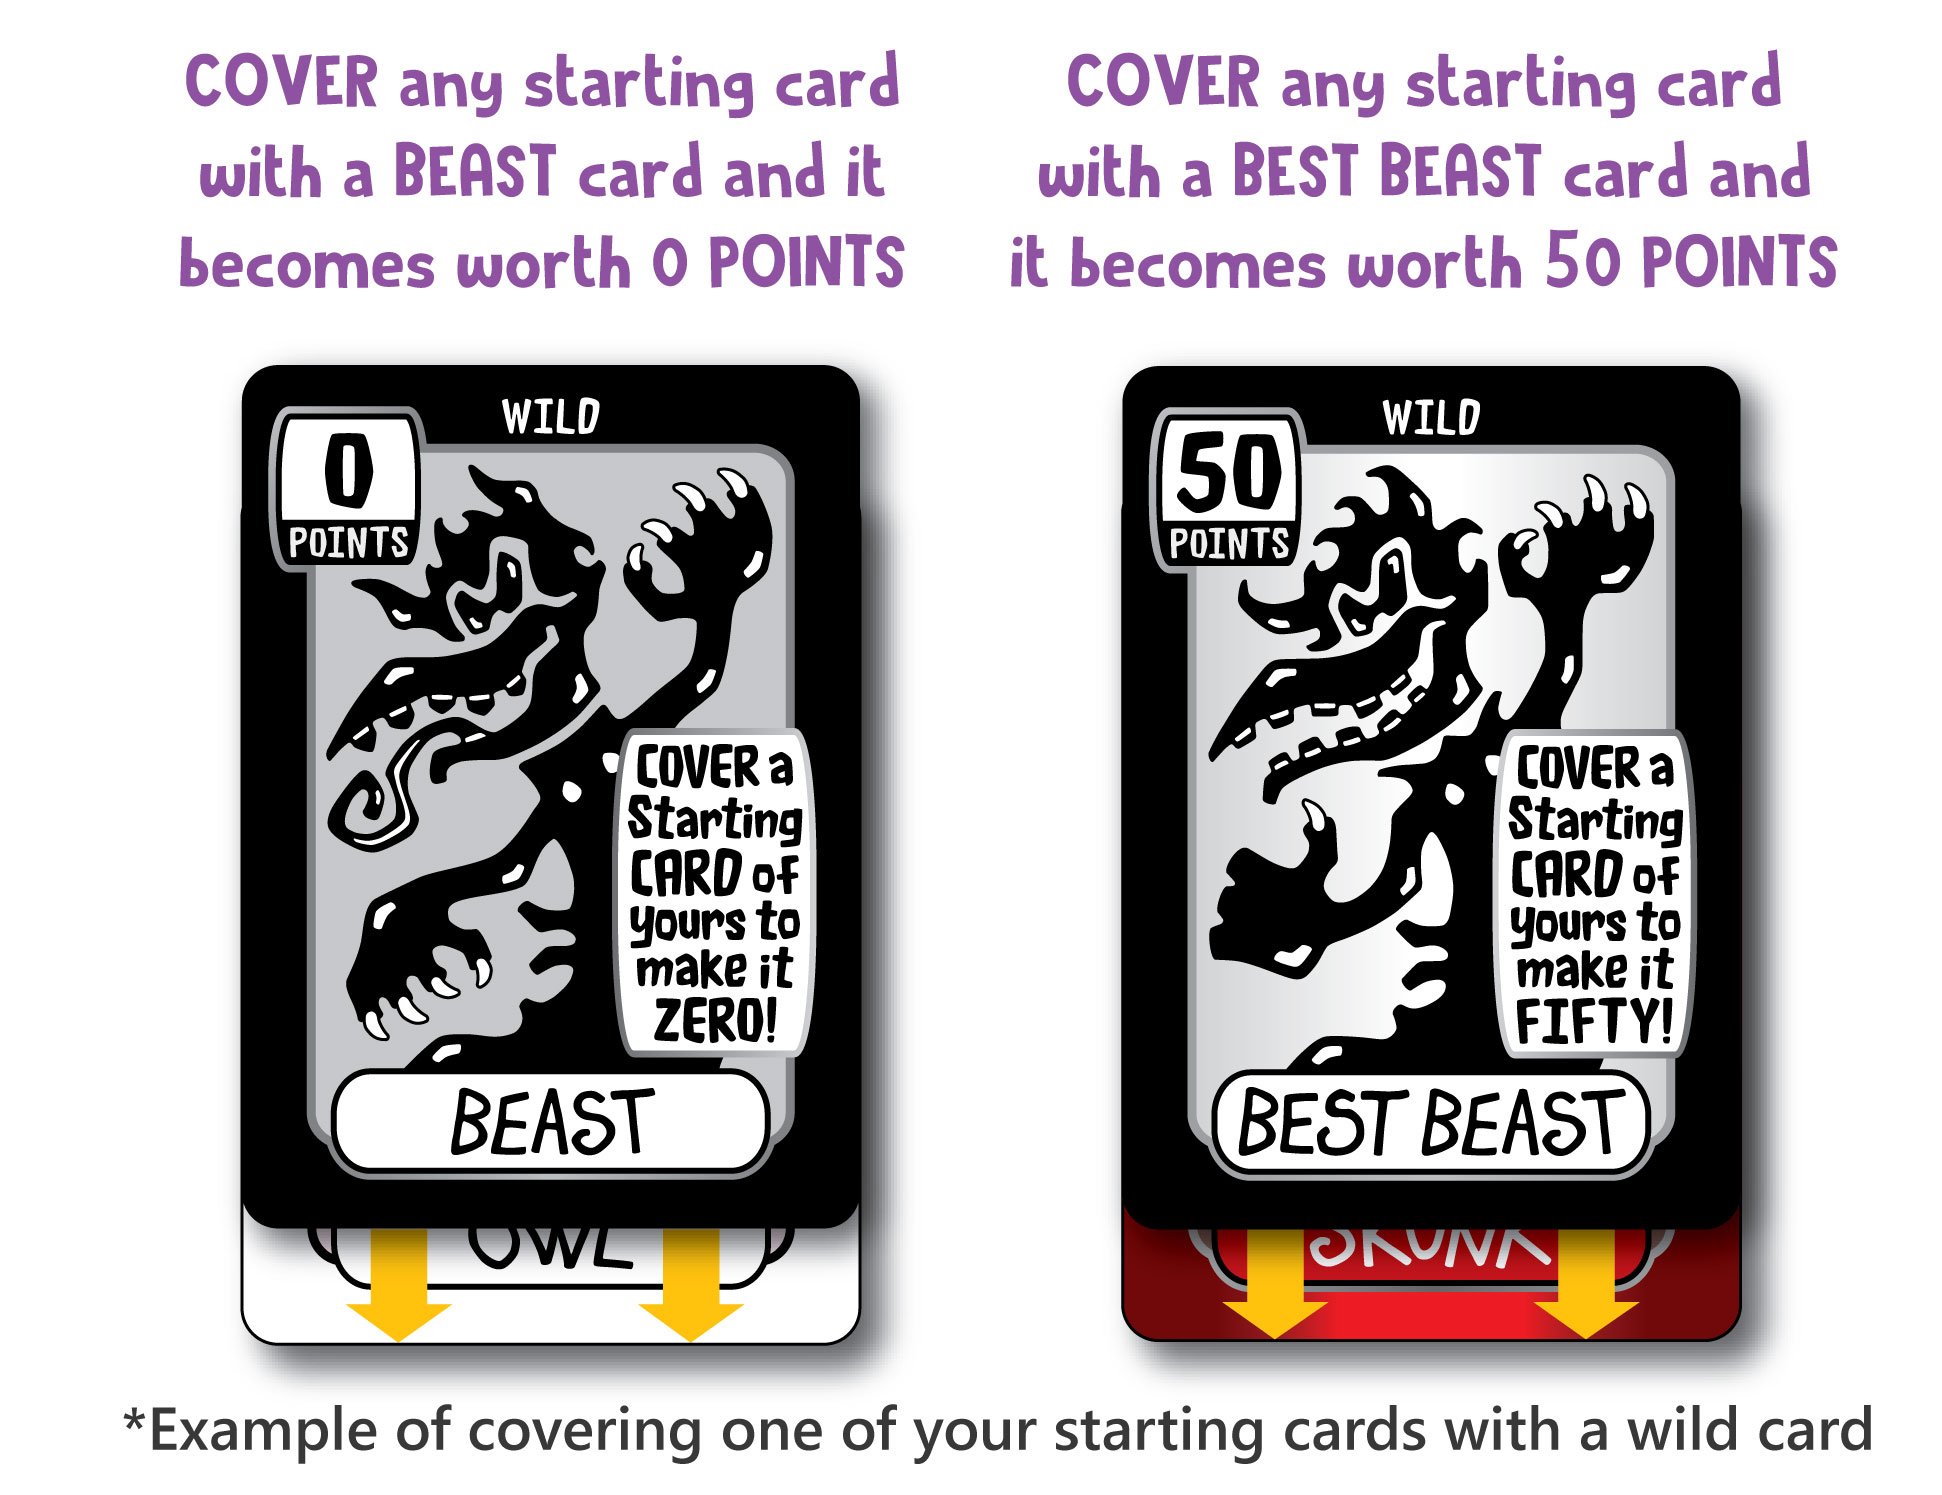
REMEMBER: Once a starting card is covered with a Wild Card, it cannot be removed. And the starting card can no longer be paired with it’s matching animal card for POINTS.
When deciding which starting card you should cover with a Wild Card there are a few things to consider:
Typically, your best choice is to select a Category Card listing the lowest indicated point value on it. MAMMAL cards are the lowest possible Category Card to cover with an indicated point value of 10... then OCEAN cards (15), then BIRD cards (20), etc...
Minus Cards seem like an obvious card choice to cover, BUT they have the potential of becoming worth big points once matched with their ANTI-Minus Card (turning them positive)! At the same time, a player doesn’t want to risk getting stuck with a Minus Card at the end of the round.
This tricky decision can also be influenced by the stage of the round...
Is it still early in the round or is it late in the round?
Is another player getting really close to winning the round…?
Do they have just two more cards to match…?? Or just one more card to match?!?!
If this is the case, you just might need to cover up that Minus Card of yours… without delay!
Lower Half Connect Cards are always worth a potential 80 POINTS, so there really isn’t any good reason to cover one up... unless it happens to be your only remaining card choice. In which case, you MUST cover it with your Wild Card… shame.
ALSO...
if one of your matching animal cards is (currently) buried in the discard pile,
and you know it’s just there just waiting for you to get a MOLE card to allow you to retrieve it… WELL, this may influence which one of your starting cards you wish to cover as well.

REMEMBER: If your starting card is already covered with their matching animal card (thus showing a black border), then you can’t (or even want to) cover it with a Wild Card.
NOTE: BEAST cards are ultimately good cards to pick because even though they turn potential points to zero, they also help a player get that much closer to winning the round!

The Dig In Pile Cards (also called MOLE cards) have brown-layered borders around them and say DIG IN PILE at the top.
There are 6 MOLE cards.
These cards are EXTREMELY useful towards helping you win the round.
MOLE cards aren’t worth any POINTS, they are ONLY USED for digging in the discard pile.
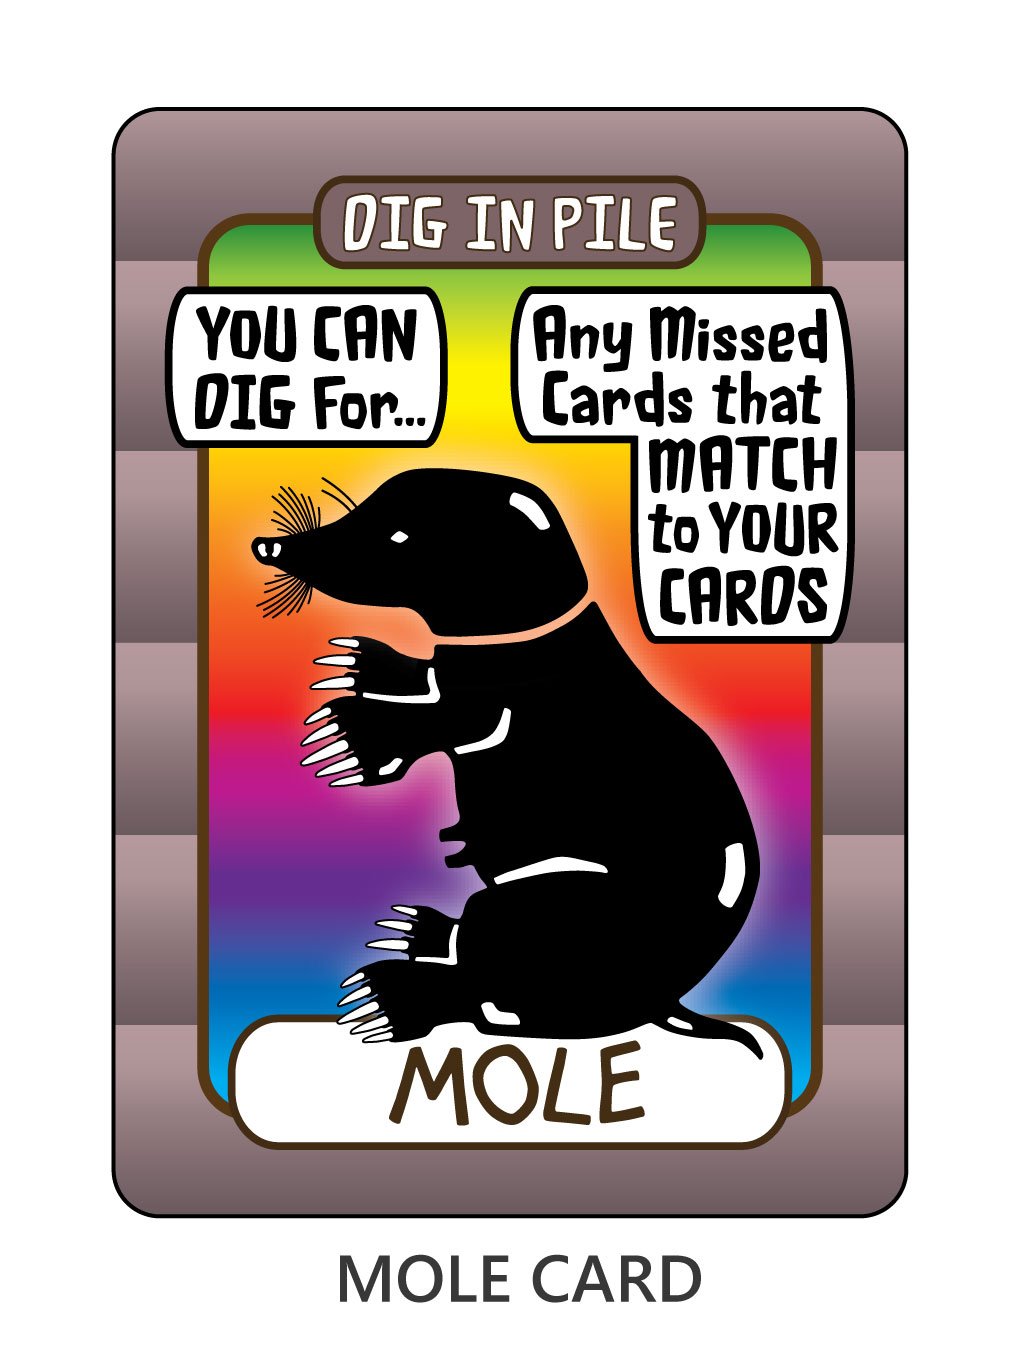
MOLE cards are used to "dig" for your missed cards that get passed up and buried in the discard pile. They allow you to pick up the entire discard pile and scan through the deck to find and take out any matching cards that can cover or connect to any of your starting cards. You may also dig for Side Bonus Cards highlighting an animal category that matches the same animal category listed at the top of any of your cards.
There are 4 types of cards you’re allowed to dig for:
Category POINTS Cards…….... (They cover Category Cards)
Upper Half Connect Cards…… (They connect to Lower Half Connect Cards)
ANTI-Minus Cards…………..…. (They cover Minus Cards)
Side Bonus Cards……………..... (They get collected off to the side of starting cards)
There is no limit to how many cards you can dig for.
NOTE: You cannot use a MOLE card to dig for any Specialty Cards in the discard pile!
KEEP IN MIND: ONLY use a MOLE card from the discard pile if you are certain (or pretty darn sure) that there is one (or more) of your cards actually in the discard pile that you missed! Otherwise, you will just be wasting time digging for no reason… and even worse, you will have wasted your turn by choosing to needlessly dig instead of opting to draw a new card.
*PRO TIP: It’s a good idea, as you play, to keep a “mental note” of all of your missed (or passed up) cards that become buried in the discard pile.
If you draw a MOLE card and it is successfully used to retrieve at least one matching card, you get to continue – return the discard pile (stacked as it was), discard the MOLE card, and pick again from the draw pile. Drawing a MOLE card is the ONLY TIME a player is allowed to access both piles during their turn.
If you don’t need to use your MOLE card (in other words… if you know you don’t need to dig for any matching cards because you haven’t missed any cards yet), then just simply discard the MOLE card. No need to dig if it’s not necessary, right.
If a MOLE Card is on top of the discard pile and you choose to use it, there is no need to remove it… just leave it at the top of the discard pile and pick up the entire stack. After you are finished digging for matching cards, your turn is automatically over. The MOLE card remains on top of the discard pile available for the next player. The next player can then re-use your MOLE card should they also choose to dig for any of their missed cards.
Yes… MOLE cards can be RE-USED by players. This will repeat, until a player opts to pick a new card from the draw pile… in which case, the MOLE card will then be covered by their discard.

Specialty Cards have gray borders around them and have the word SPECIALTY at the top
There are 3 different Specialty Cards.
The HYENA card, the RACCOON card & the EARTHWORM card.
Specialty Cards aren’t worth any POINTS, but rather each card has you perform a special task that you MUST do if you’re able to.
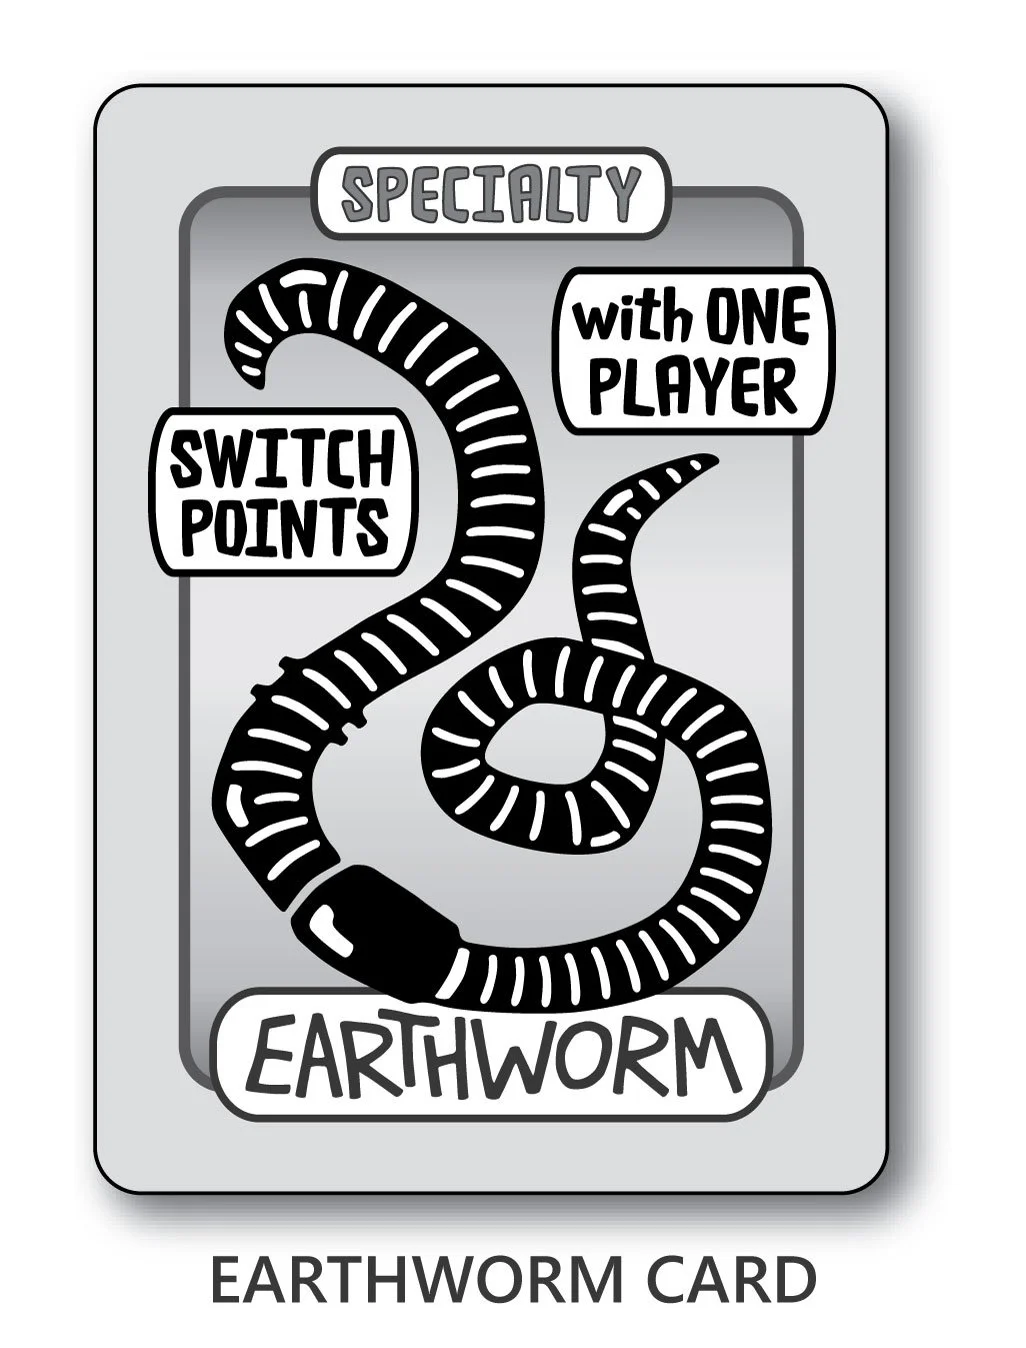
The EARTHWORM card – Has you SWITCH one of your cards worth POINTS with another player’s card worth POINTS (if you both have cards that are worth POINTS).
An Example of Switching:
SWITCH your BEAST card
worth 0 POINTS with a player’s
Upper/Lower Half Connect Cards
worth 80 POINTS.
*Ideally, switch your lowest POINTS card with a player’s highest POINTS card.
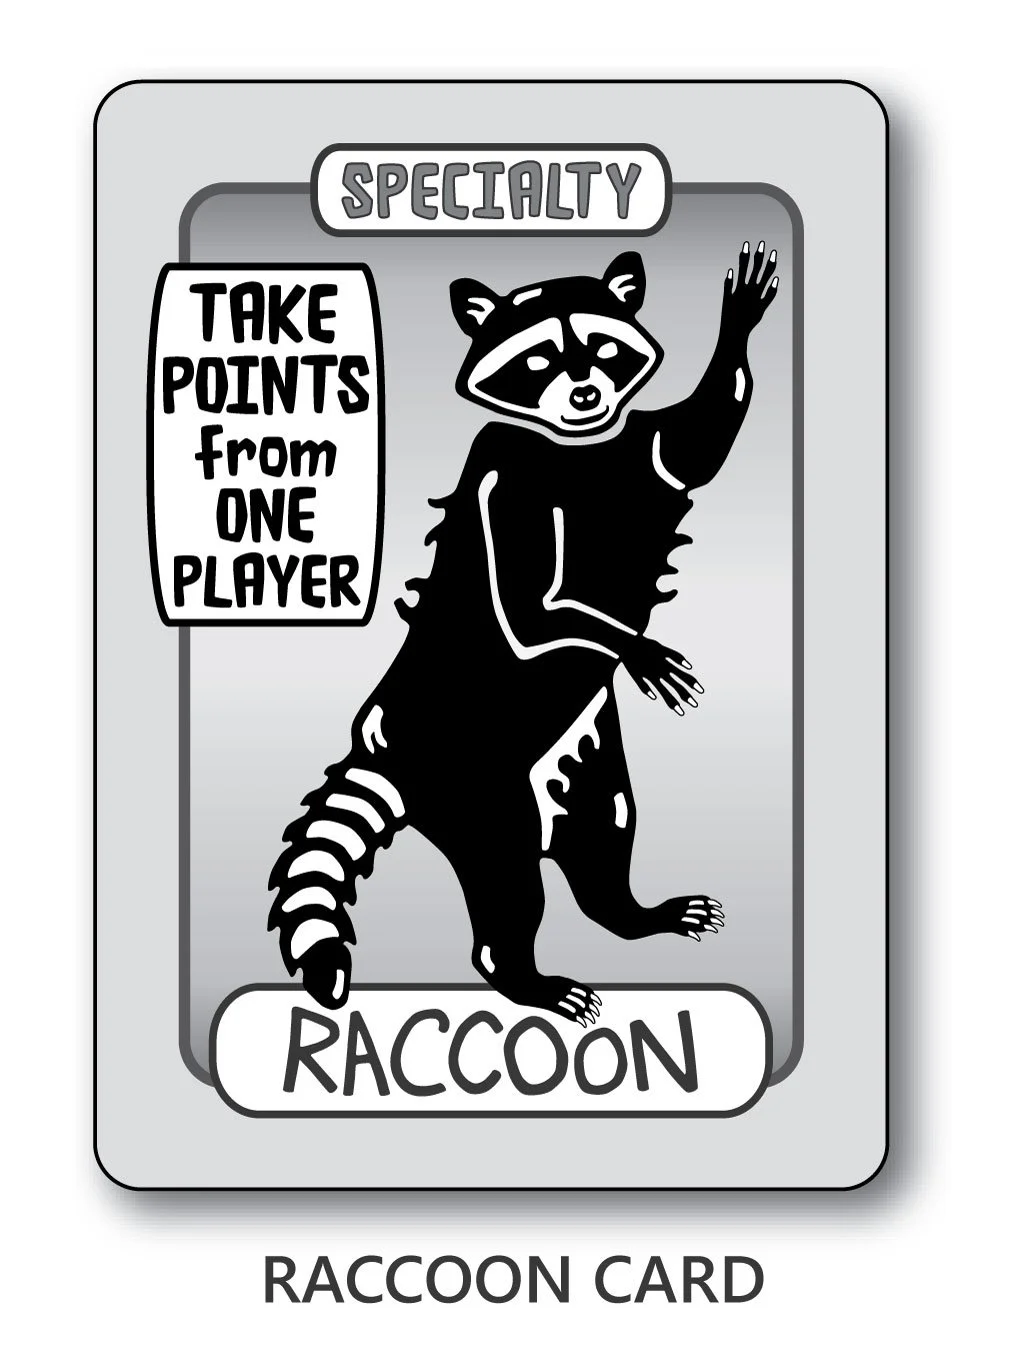
The RACCOON card – Has you TAKE a card worth POINTS from one player (if they have any cards that are worth POINTS).
An Example of Taking:
TAKE a player’s
Side Bonus Card
which will be worth bonus POINTS
no matter if you win or lose.
NOTE: You don’t need to have a matching category card in your starting cards to be able to take another player’s Side Bonus Card highlighting a certain category. It doesn’t matter… you can TAKE it regardless. You take ONLY the player’s single Side Bonus Card… not along with the player’s category card(s) that matched to that Side Bonus Card .
*Ideally, take a player’s highest POINTS card.
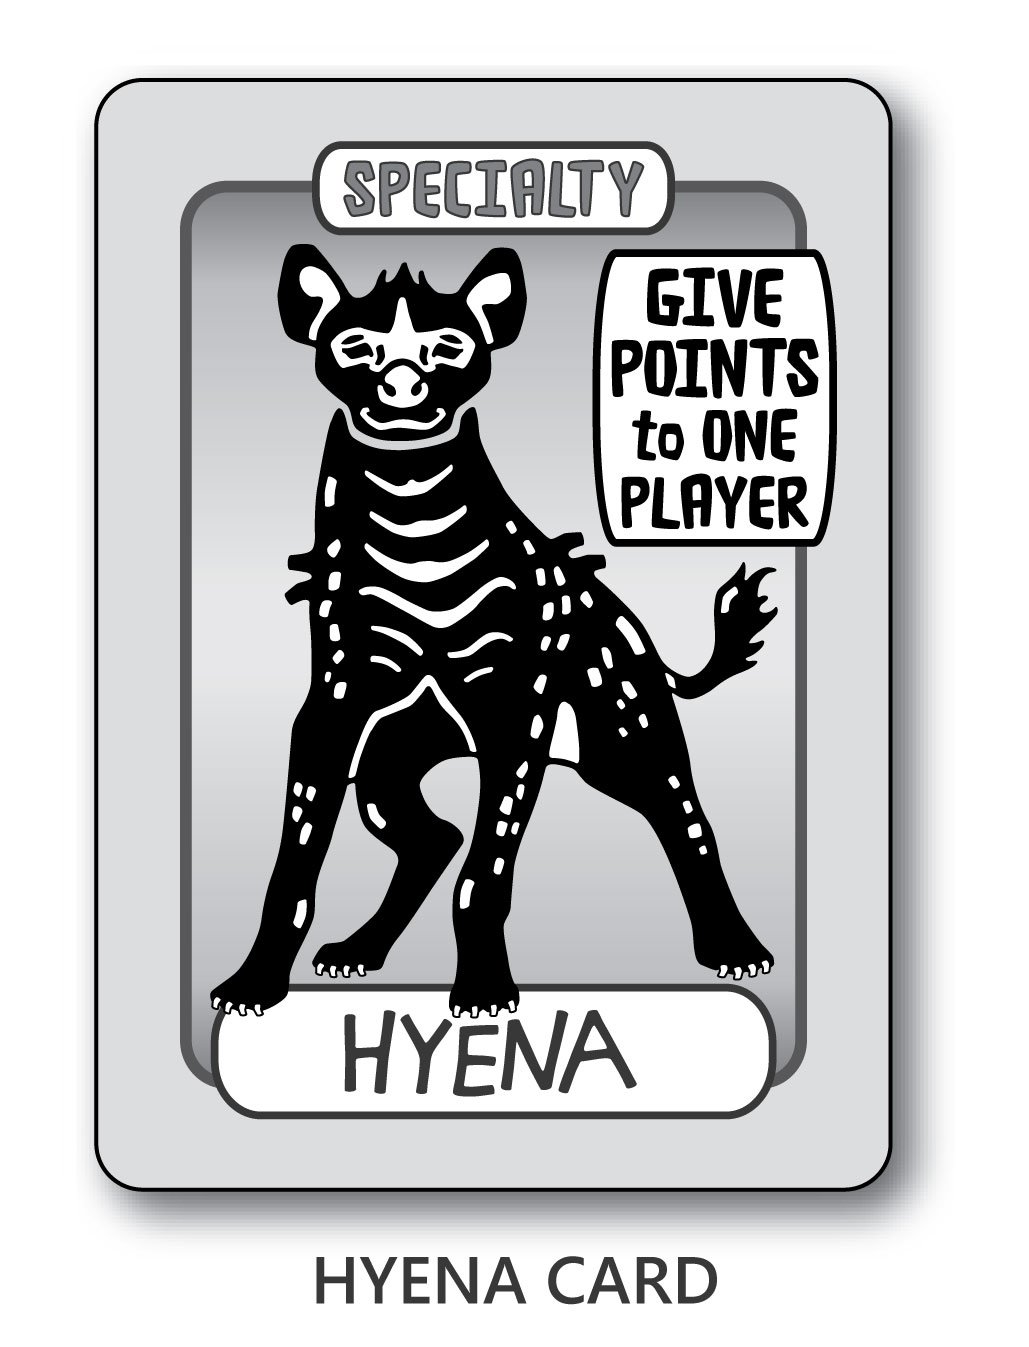
The HYENA card – Has you GIVE one of your cards worth POINTS to one player (if you have any cards that are worth POINTS).
An Example of Giving:
GIVE a player
a BEAST card worth 0 POINTS.
OR… give them a MINUS card
and not have to worry about
getting stuck with it.
*Ideally, give a player your lowest POINTS card.
Keep in mind that ANY POINTS… inclding Minus POINTS, 0 POINTS, as well as Side Bonus POINTS are ALL considered POINTS and can be switched, taken and given by a player when performing a Specialty Card task.
— HOW TO TRANSFER CARDS THAT YOU GIVE, TAKE, or SWITCH —
If a POINTS card is covering or connected to another card... you transfer both cards.
Otherwise, you will be transferring just a single Card.
These are the six kinds of cards that you can transfer:
Category POINTS Card: Transfer this card with its matching Category Card underneath it. (Both)
Upper Half Connect Card: Transfer this card with its matching Lower Half Connect Card below it. (Both)
ANTI-Minus Card: Transfer this card with its matching Minus Card underneath it. (Both)
Wild Card: Transfer this card with the (un-matching) starting card underneath it. (Both)
Minus Card: Transfer this one card by itself. (Single)
Side Bonus Card: Transfer this one card by itself. (Single)
All transferred cards get placed in the player’s row of starting cards (along either side, where space is available). You may need to shift your row of starting cards a bit to accommodate your newly acquired cards. Or you might be left with an empty gap in your row of starting cards if any of them were transferred to another player… in which case, you can always reposition them into evenly spaced rows again.
IT’S INTERESTING TO MENTION: If the tasks of a RACCOON card and a HYENA card have both been performed during the round, then it is possible for a player to be left with only four cards in their row of starting cards. And it is also possisble for a player to have up to eight cards in their row of staring cards!
Each Specialty Card can only be used once and cannot be used again by another player.
They are one-time use only.
NOTE: Once a Specialty Card gets buried in the discard pile, you can’t use a MOLE card to dig it out, even if that Specialty Card hasn’t been used yet by any player..
Whether a Specialty Card is drawn or on top of the discard pile, you MUST always perform their task if possible to do so.
If you draw a Specialty Card and you’re able to perform the task, your turn continues- discard the Specialty Card and pick again from the draw pile.
If you’re unable to perform the task - simply discard the Specialty Card - the next player must now do the task if they are able to.If a Specialty Card is on top of the discard pile and you’re able to perform the task, after doing the task your turn ends - next player.
If you’re unable to perform the task - just simply draw a new card.
NOTE: There will be times when it’s not possible to use a Specialty Card. This usually happens early on in the round when players don’t typically yet have POINTS showing for any of their starting cards (unless they were dealt a Minus Card, in which case… they will have POINTS showing).
REMEMBER: You don’t keep Specialty Cards – they always get discarded after being drawn. And once they get buried, they can no longer be performed… they, unfortunately, become “void”!
In the RARE circumstance that none of the players are able to finish getting
POINTS for all of their starting cards before the black deck runs out of cards…
then every player gets to tally up ALL their POINTS that they have showing to this point, and score them down!!
(This also includes Minus POINTS and Side Bonus POINTS).
EVERYONE GETS TO SCORE! – Yippy!!
The player with the highest tally for that round will be dealt the first card in the next round:)
ALL RIGHT!
I think I covered every possible
Situation THAT you can
encounter while playing
my ZOP ZOO card game.
You now know the rules!
That said
as with MOST newly learned
games... feel free to alter
any rules if you wish to
PERSONALIZE your experience
whILE playing with
friends & family.
After all
the whole POINT of my game is
to HAVE FUN PLAYING!!!
I must say
Creating this card game with
my zop animal illustrations
has been a true
labor of love of mine FOR
the past 10 years.
I’m SO thrilled AND PROUD
to be finally sharing it
with you now!
HAVE A GREAT TIME playing!
-Doc:)